I had a blast with the Neil Thomas ACW rules the last few days and am happy to share my thoughts, pics, and observations from the battle!
 |
Bragg's Corps Advances to hit the Yankees by surprise!
|
This was all unintentional, BTW. I really just set out to lay down the caulk road network for Shiloh and see if I had enough for our Altar of Freedom game this month. One thing led to another and I threw some trees down. Then I threw down the troops (in 15mm). Next thing you know, I'm rolling dice!
 |
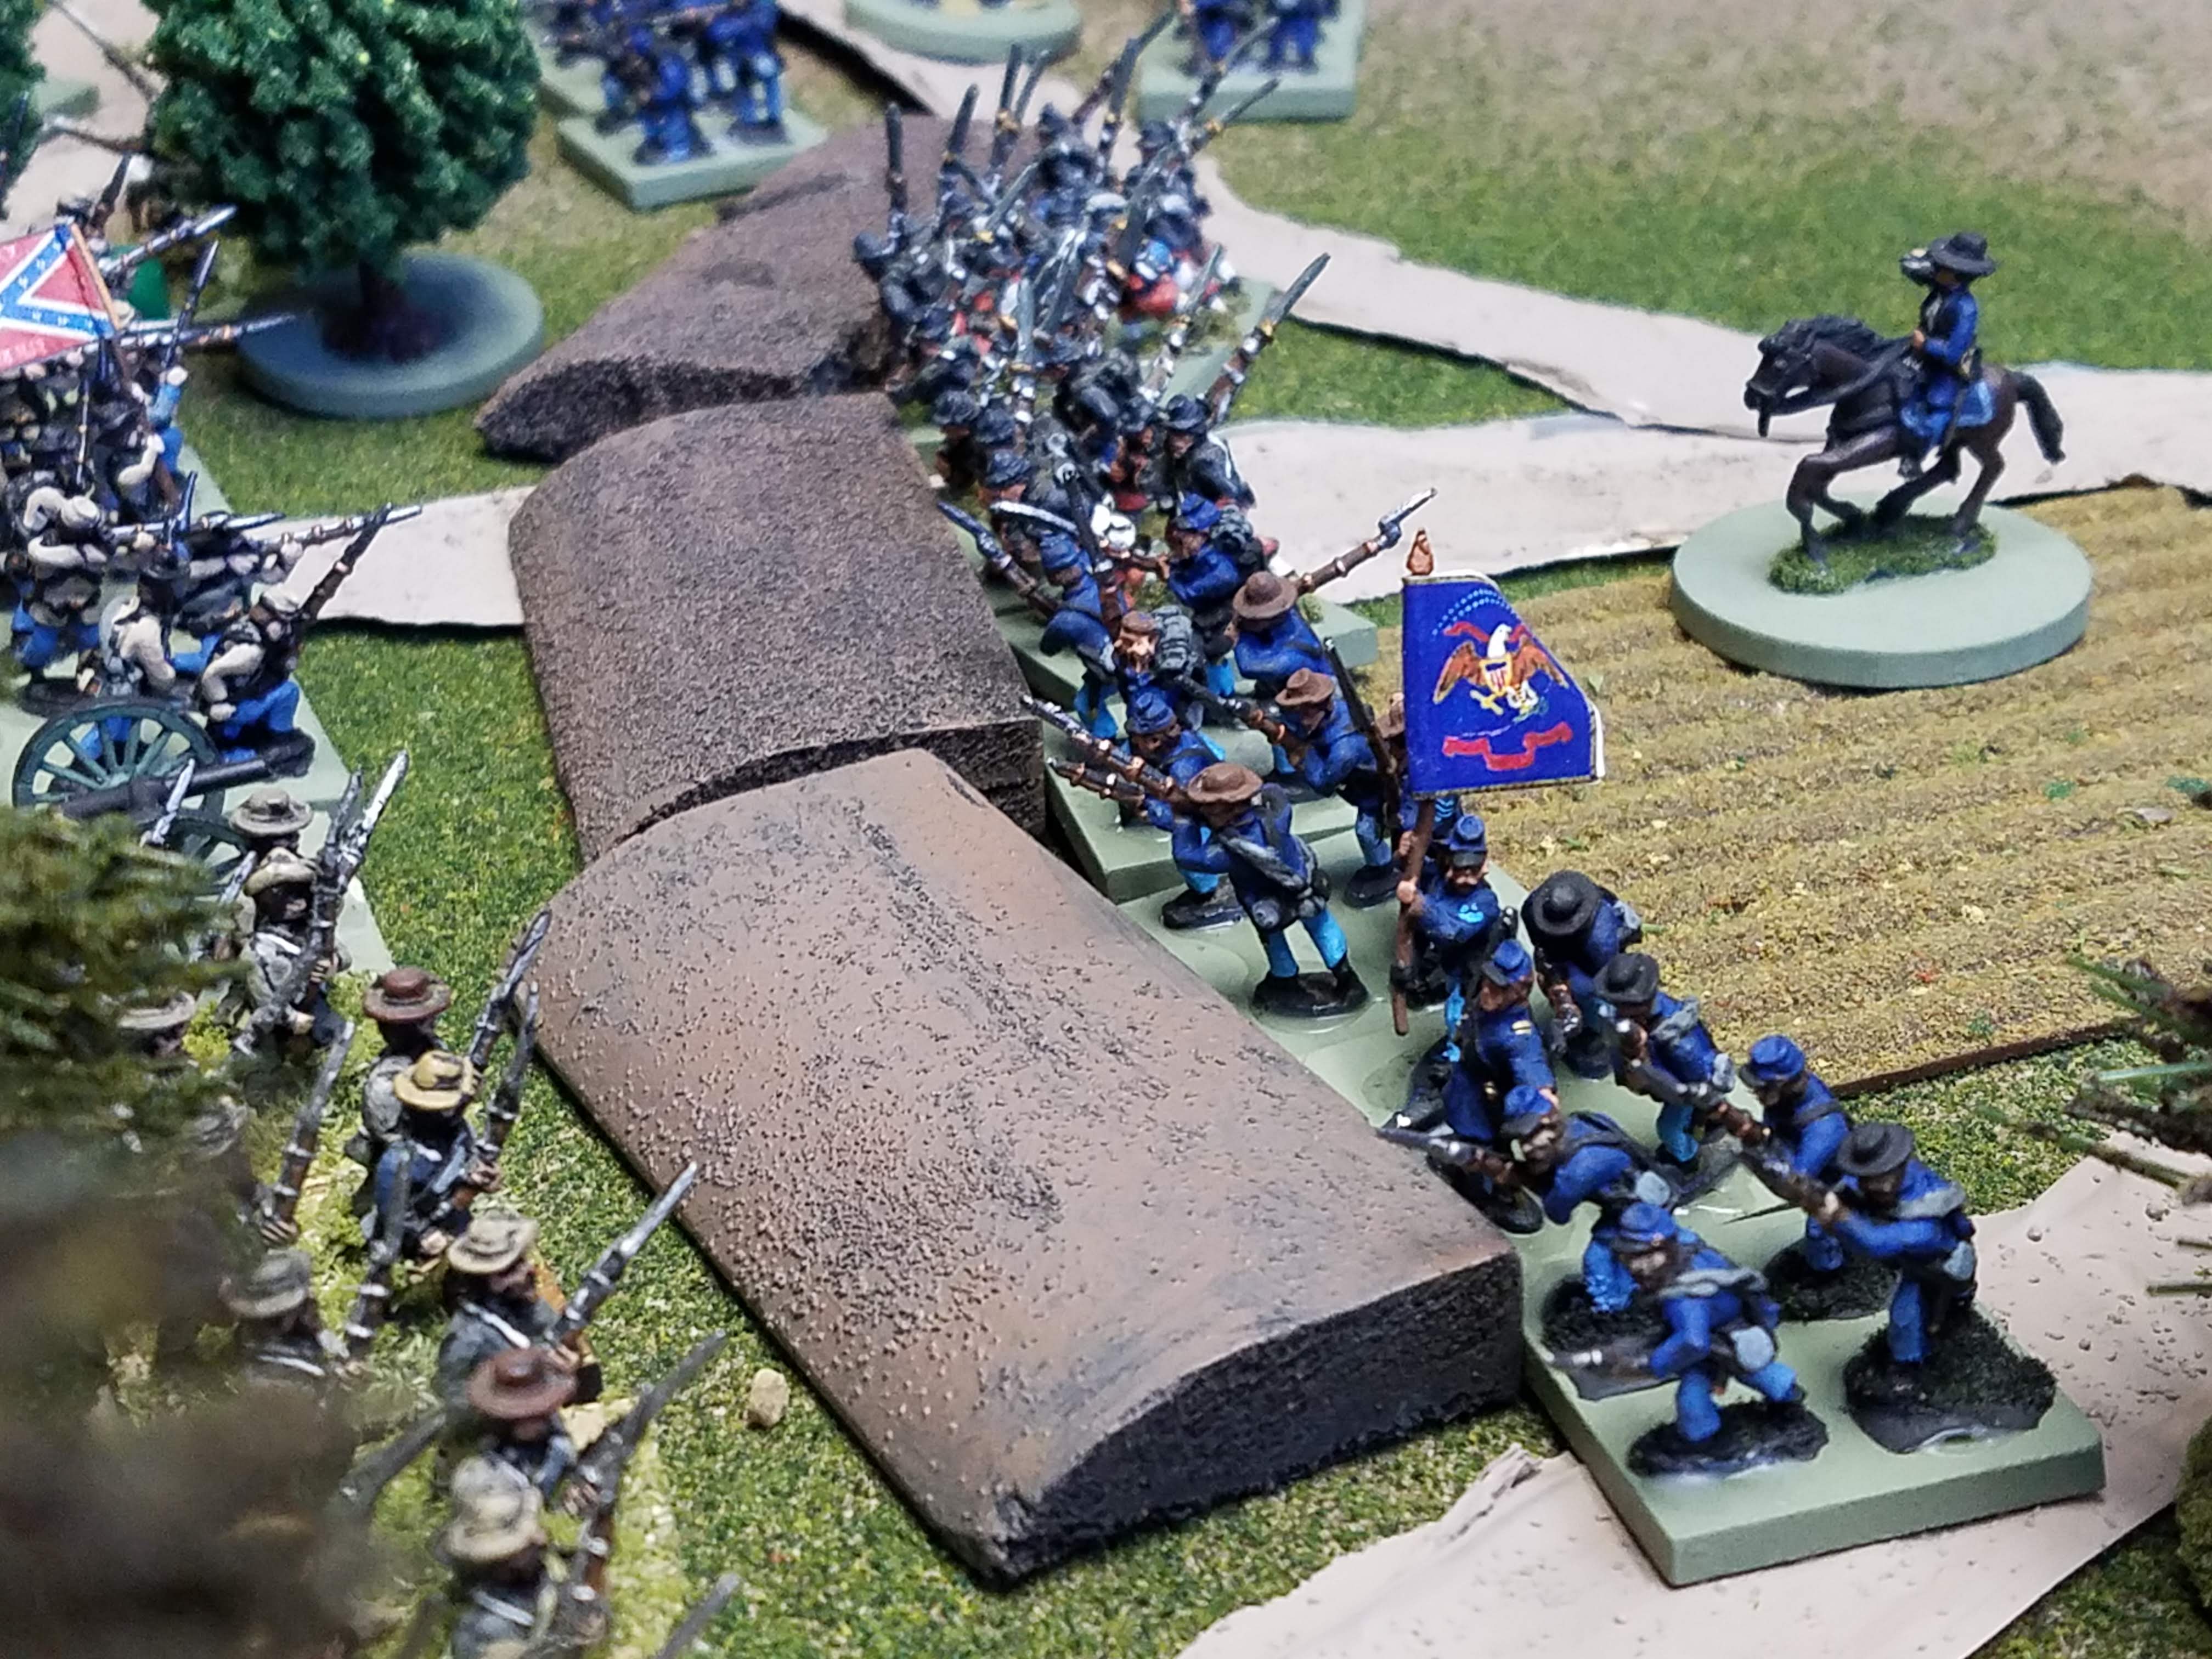
| At the Hornet's Nest in the sunken road |
 |
| The entire battlefield |
This was the first time I played Neil Thomas' ACW rules from his "Wargaming: An Introduction" book.
First of all, half movement of the infantry units was horribly slow - 4 cm's - in the woods and 8cm's standard. Same from the Napoleonic rules for line units. The problem? Shiloh is mostly wooded, so the average "speed" of the infantry is 4 centimeters in the this battle. Luckily for me, both sides start close to the action. no approach marching here! also no rules for roads?
 |
| I placed Sherman's Division where the action was expected to be thickest! A formidable position! |
 |
| The encampment for the Yanks! That fire ring is still warm! |
 |
Bragg's troops approach the Shiloh Church - the artillery taking lots of casualties
|
 |
| Polk losing his way in the woods. He's scribbling a note to Jefferson Davis explaining his boss' role in getting his Corps lost. |
 |
| Union right flank anchor. The woods next to Owl Creek would become a rock |
 |
| The entire battlefield. The Union lines are in the middle roughly following the road. |
 |
| Gratuitous picture of the assault going in! |
 |
| Moving up to assault along Lick Creek |
 |
| Moving up to assault the Hornet's Nest! |
The Rebels were plagued by "traffic management" all day. There were plenty of artillery batteries to go around. The problem was managing the space into which to put them! At least 3 to 4 batteries were behind the front line while the infantry did the majority of the killing from turns 4 to7. The Rebels managed to bring up and "find room" for a Battery in front of the Sunken Road, however. An issue became complex maneuvers and the (lack of) rules to judge them. With the extremely small movement allowance of 8cm in open and 4cm in woods, all movements became extremely fiddly. i may have started "fudging" things... I guess you can do that when you play solo, and provided you afford "mulligans" to both sides!
 |
| Artillery to the....rear? |
Much like the real battle, the plan fell apart in the woods. Corps on the attack became intertwined, especially as casualties started to mount. Single-Stand "Brigades" (I bathtubbed the battle...) were lost under the canopy of model trees and may have missed their rally roll each turn. The rally roll is a unique feature to NT's ACW rules and I'll talk about those in a bit.
 |
| Breckenridge's Division thrown right in from the march. They'd take a covered and concealed route through these woods as their artillery "softens up" the Yankee positions. |
 |
| Bragg's attack gathering momentum but the guns are falling behind in order to keep the infantry at the front. |
On the rebel right, the fighting in front of the Hornet's Nest devolves into a murderous firefight as none of the Rebel units are able to pass a charge test of 5+ each turn! They bring up the field artillery and begin blasting away at the tenacious yanks, so much so that by turn 10, Sherman is switching out Brigades with fresh ones as best he can under constant fire. Don't worry, though, the Yanks are giving as well as they are getting and the Rebels' "second line" finds itself now the first line as the lead Brigades break.
 |
| The Rebel right flank, under tremendous pressure, ensures a firelane is open to blast the Yankees out of position. |
The rallying rules for the ACW set are inspired and offer some very unique tension. It's exceedingly hard to kill infantry units! Especially when you've worked hard to coordinate fires of 3 separate units and the guns, opened up the fire lane for the guns to shoot through, and eliminate a base, only to find the base come back the beginning of their next turn!
 |
| The 2 stand Rebel unit here could do with some interpenetration rules. Sorry everyone - they're not in the ACW set. I ruled in favor of inter penetration and was able to extricate both Yanks and Rebs from precarious positions! |
 |
| The Rebels did NOT want to get stuck in here. I think out of 20 turns I played, only 2 Rebel pre-charge checks passed in front of the sunken lane. I wouldn't want to take that position, either. |
Around Turn 14, the Rebels make a concerted effort to straighten out their lines. Interestingly, they've made modest breakthroughs on the left and left-center, forcing the Union lines to pull back slightly. Notably though, the Union Reserve hasn't moved yet! The Rebels are down 5 x Brigades to the Union x 1. That's it after 14 turns of shooting and killing. the no fire and move rules are not helping the rebels, either. It takes 2 x turns to set yourself up to charge, assuming you pass the check!
 |
| Fresh Union units move up from their second line to occupy frontal positions. |
 |
| Fighting near Lick Creek and next to the Sunken Road. These brigades would be trading fire all day, with both charging and being repulsed. |
 |
| Sherman's battered brigades are still amazingly holding on. |
Probably worth mentioning here the devastating effect of hitting on 3+s. Also, Neil doesn't explain the rules for his artillery well here (not as well as in the Napoleonic rules a chapter or so before) and so I dont halve my fire - instead rolling up to 12 dice at a time! It makes the batteries truly much scarier at close range but if you can reach them , they're knocked out. Breckenridge's men took the Union battery on the Union right by storm and knocked it out easily.
 |
| Straightening out the Rebel lines and preparing to storm the Union positions along the front line |
The Rebels see many vulnerabilities in te Union lines, but an infantry unit is extremely tough thing to kill in the ACW rules if it's in cover (4+ save). Most of the Union units are in cover and the Rebels see success where they're able to incorporate close range assault-artillery fire and infantry. In a few cases, Rebel units are able to assault when they pass their charge roll. Not many melees at all.
 |
| It took most of the day but these Rebel Brigades were able to battle from the south end of the Shiloh Church up to the North end! |
 |
| Fresh Rebel units are thrown into the Assault |
Breckenridge's men on the Rebel left achieve a breakthrough mercifully as the Union Field Artillery rolls a "snake eyes" for its final cannister salvo, and the 2 x stand Brigade goes in for the kill. It's the first solid breach of the Union line all day and if they dont move, their sister Brigade to the left will be cut off. The Union begin a slow withdrawal north to new positions. The reserve is shift slightly towards the river to be able to react to a breakthrough at the Hornet's Nest or to refuse the flank and protect the river landing.
Thoughts
Anyone who has followed my blog knows I love the Neil Thomas stable of rules. These rules are no exception but like most NT rules, they need some sanding and polishing around the rough edges.
Out of all of the rules in the Introductory Wargaming book, perhaps the ACW ones are the most "loosely" written and fail to cover some important things that should be covered in such a popularly gamed era. That's fine, I've thrown enough dice in my day to fill in the blanks, but with such dramatic departures from the Napoleonic rules just a chapter before, my hope is that some of the rules from the Napoleonic set are not simply "implied" but rather were intentionally left out.
Interpenetration is one thing that is not mentioned (at least that I saw) in the ACW rules. Road movement and formations are also not present. In this battle, consisting of most wooded areas, bisected by an extensive road network, rules for road movement are important. I assumed units were changing formations as they needed to and counted road movement as "open" movement and just pushed units their modest 8cms along the roads.
No rules on complex maneuvers, either. Not that I want any complexity, but understanding how to move my troops is important.
The rallying and morale rules are a nice touch and add much flavor and differentiation to the ACW rules here from the other rules in the book. The game itself is extremely simple and able to be picked up quickly (I should hope so with a name like Wargaming: An Introduction!") but still gives a perfect amount of detail that it gives an incredibly fun and satisfying ACW game. I highly recommend anyone give these rules a try but read them thoroughly first and understand their differences from teh Napoleonic and earlier rules in the book.
Anyways that's all for now! I'm picking through some other rules I really want to play for this month. I know I have a very ambitious schedule on teh agenda and I dont know if I'll get to all of these games but a guy can dream!
Looking forward to playing:
- Two Flags - One Nation, Norm's Hex Based ACW Rules on a gridded surface
- the ACW Blucher Variant "Chamberlain" published by the Old Meldrum Wargames Group
- One Hour Wargames ACW Rules on a gridded surface
- Altar of Freedom - Battle of Shiloh in 10mm
That's all for now! Hope everyone is having a great ACW-ruary (TM to Stew for that name, BTW)


Great action - and the rules seem so adaptable - great stuff.
ReplyDeleteLook forward to TFON and the Blucher variant.
Fascinating experiment.
Cheers Darren the rules gave a good and infinitely hackable game :) just needs some polishing.
DeleteThanks for a very detailed AAR Steve, with lovely pics to accompany the text:). I find that with all of Neil Thomas', you do often need to use common sense to fill in the blanks in his rules. Nothing wrong with that when playing solo, but it can be a tad frustrating at times!
ReplyDeleteI've received my copy of the book this week but as yet, I haven't had the time to read it, but will look at the ACW chapter in light of your game.
Steve looking forward to you digging out the WAI book and interested to hear your thoughts on the ACW chapter.
DeleteLooks good, Steve! "Wargaming an Intro" is not one I have. I don't care much for rules with lots of holes but this my preference only. Will you be using this same scenario for each of the rules' trials? By the way, I have not forgotten about "Wargaming 19thC".
ReplyDeleteThank you Jonathan. I have always liked the NT books and the simple but elegant rules they present. The rules have a decidedly "old school" feel to them while being playable in a modest amount of time and space.
DeleteI will vary the scenarios a bit for the rules I think. I am very interested in putting the Blucher ACW variant on the table as Blucher allows an entire battle to be fought. The others I just want to play because I miss playing them :)
A hard fought, epic encounter! I enjoyed reading that.
ReplyDeleteMust dig out my copy of the book now to read the morale rules.
The morale rules are probably the most interesting of the ACW set, especially if you've played any of the other rules in the book, the ACW rules are very different.
DeleteI haven't played NT's ACW rules for fives years. Like you I found I had to fill in a lot of gaps, but I see that not only did I do that, but I noted the changes in the game report I wrote. You can see it here:
ReplyDeletehttps://hordesofthethings.blogspot.com/2016/01/neil-thomas-acw-again.html
I've been looking at trying some more rules from Wargaming: And Introduction, so this was a great post to read today!
KK I'm interested to hear your take on some of the other rules in the book, particularly the WW2 rules, which I have very much liked but am not sure if I've been playing them correctly :)
DeleteGoing to read your ACW WAI post now.
I had a play around with the WW2 tank stuff many years ago:
Deletehttps://hordesofthethings.blogspot.com/2016/03/neil-thomas-tanks.html
There's one game report, which includes some stats:
https://hordesofthethings.blogspot.com/2016/03/one-hour-wargames-scenario-18-counter.html
(I notice both posts talk about ideas and notes, but I have no idea where or what they are any more :-D )
I have played the Pike & Shot set in the past. They're OK, but there's something not quite right about how mixed units work in close-combat. But maybe I need to play more games.
Interesting - I've played the ww2 rules and really like them, and the napoleonic rules and loved those. I've also adapted the Nap rules for SYW using NTs "Ancien Regime" rules in "Napoleonic Wargaming" playing a huge Battle of Prague with them last year.
DeleteChecking out your ww2 battles now.
Great write up - first time I’ve seen the rules used to refight an actual battle and seems they worked rather well! Can’t see any John Denver, though. 😁. I use a set from Wargames Illustrated which is managed with a set of order cards. I think I’ll try the order cards with NT’s rules when I get the chance.
ReplyDeleteCheers Jeffers. I had been wanting to fight a "real battle" with the NT rules for some time. No John Denver in this post but we probably haven't heard the last of Mr Denver this month!
DeleteReally intereated in using cards with the NT rules!
Very cool looking game. Shiloh is probably my third favorite ACW battle. The loads of woods on the table always make it interesting and the CSA has to untangle itself and attack at the same time. Which gets complicated. 😀
ReplyDeleteGlad you liked the battle, Stew. These rules were very unforgiving with the woods and it took a long time for the CS troops to get into position. The attack at same time never materialized they went in piecemeal!!
DeleteWhat a fantastic sight, a large-scale game of American Civil War. Lovely looking terrain and figures with some long firing lines. Beaut stuff!
ReplyDeleteRegards, James
Thank you sir it was much fun!
DeleteInspiring stuff indeed! I
ReplyDelete‘M thinking back to glory days of Airfix ACW gaming! Loved the photos and rules analysis!
Thanks Mike! I've always wanted to play a bigger battle with the rules!
Delete