Thursday, May 28, 2015

Panzer Vorwärts! Aber mit Verstand!

Well it's about time I got my rear in gear so to speak.  I have not posted anything hobby-wise in awhile and thought I would post a progress check for all of you to see I'm not completely off the net these days.

Major projects when I've found the time lately have been getting ready for my D-Day game featuring the 12th SS HJ assault against the North Nova Scotia Highlanders and the Sherbrooke Fusiliers in vicinity of Buron, Authie, and Cussy on or about D+1.  Originally I wanted to play with the Battlegroup Overlord rules but given the scale and the fact that I may not have all of the vehicles completed in time, I'm thinking I could play the game with my GHQ rules, Blitzkrieg Commander, or possibly even Rapid Fire...

Anyways, here are some shots of recently-completed Armor off the assembly line!  Some 15mm PSC Panthers, a Mk IVH, a handful of beefed-up Mk IIIMs, and to make things interesting, I started a platoon-pack of Waffen SS Infantry from Battlefront.  These will be either individually based, or based in teams (a la the Battlegroup family of rules).

I experimented with the camouflage "Plane Tree" and although it's not perfect, I'm happy enough with how it turned out.  And as it turns out, patience is a big part of getting camouflage right.  That explains why so many of my camo jobs turned out....not so right

Panther taking up firing position somewhere in western Russia, Spring 1944
 For this batch of armor, I followed the steps in the Battlegroup: Kursk book.  Prime and undercoat, dry brush, wash, detail, more dry brush, more detail.  sealant.


Still left to do: apply my secret formula around the decals to make the edges disappear.  This works brilliantly when I can get the combination right.

I experimented with the "paint chipping" as recommended in the Battlegroup Kursk book.  Along the front glacis in front of the hatches it actually turned out pretty well.  Around the turret I think I had too much paint on the brush and it got smudged.

This big cat turned out very well and I'm happy with her.


All panzers are in position sir!

A Mark IVH of the dreaded 12th SS HitlerJugend Division.  TC is wearing a "pea dot" coverall set with the ubiquitous grey garrison cap.


Scanning for targets.  "Reconnaissance has spotted the Tommies!"  and if you look close, you can see the 12th's marking on this tank.


Driver forward!  Prepare to engage targets!!
 Meanwhile, back to the Russian Front....nimble Panzer IIIs dart for cover.  They are no match for the horrendous 85mm gun reportedly on the new Russian tanks!


Still needing detailing on this one.  I guess I just really wanted to take these out to play!

Targets spotted!


 This next batch of pictures are my unfinished group of 12th SS troopers.  They still need some of their kit painted but for the most part, they're finished.  I managed to get the same colors from the Flames of War painting guide "How to Paint SS Camo" and they worked brilliantly.  The only thing I'll admit is that I need to mass-produce these guys so instead of breaking out my "obscenely small paintbrush" that worked so well during my US Army M-81 painting frenzy, I opted for my smallest "normal" brush and dabbed the dots on.  I also skipped the dark dots as it looks like leopard print from a New Jersey shopping mall when I added those...

Started with the light green base.  Added the brown splotches, then the dark green splotches, then light green dots over all the splotches.  Since I'm lazy, I just gave them "dunkelgrun" pants!!


damn officers, they forgot my dots.
Stay tuned.  I can't promise I'll have alot more things to post, but more is coming none-the-less.  Family vacation next week so almost no time for hobby work.  That said, a game could be in the cards for next weekend.

 Here's a list of actual, yes actual, projects I'm working on at the moment:


  • Microarmor Panzer IIIM platoon almost finished (Team Yankee / Blood & Thunder)
  • Microarmor BTR-70 platoon (just the transports) almost finished. (Team Yankee)
  • Canadian Shermans.  Lots of them.  In various stages of completion.
  • 10mm Napoleonic Battalions.  Almost finished with a "standard brigade" for Napoleon At War.  That is 4 six-stand battalions to include their artillery support, light infantry detachments, and artillery battery.  I have 2 strips of 5 troops per strip on a base. Funny that all this work will go into playing 1 game.  (in all seriousness, I may start playing other rules sets with my 10mm stuff for Horse & Musket stuff.  I am starting to realize my modest 6 x 4 table will never host Eylau or Waterloo in 15mm so it might be time to rethink plans and keep all that 10mm stuff.  Thank GOD I didn't get rid of it!!!).
  • 15mm US WW2 GIs (about 20 of them, individually based in troops and teams to play Disposable Heroes or Battlegroup Overlord)


Monday, May 25, 2015

Memorial Day

Thinking of the fallen today.  Especially Major Tom Kennedy, Captain Anthony Palermo, Lieutenant Luke Wullenwaber, Lieutenant Mark Dooley, Staff Sergeant Roland Castro, and Specialist Joseph Suell.  Rest in Peace, Brothers.

Thursday, May 14, 2015

"Muskets & Mayhem" Small Game & Painting Progress

Mostly a catch-up day today on chores, etc around the house but I was able to also catch up a little on my painting and play a very small, very quick game of "MUSKETS & MAYHEM."

So a few pictures from my SYW game, followed by Old Glory 10mm Napoleonic French, Battlefront WWII Canadians, and finally Israeli Halftracks for BATTLEGROUP: Sinai.

The game was a Seven Years War battle between 4 Austrian "Regiments" and 3 Prussian ones.  Accompanying them on each side was 1 battery of artillery.

Turn 2.  The Prussians refuse the left.  Austrian artillery limbers to catch up!


An Austrian Regiment charges the Prussian right.  The Prussian Regiment fails its pre-charge QC and beats a hasty retreat right off the table!

Never good.  2 Prussian Regiments left facing 4 Austrian ones!  All of the units on the table are starting to rack up casualties now.


Like usual, the Hungarians get the worst of it.  Shaken with 2 stands left.  


The Prussians hold on by their fingernails


Solid Prussian volleys and lots of good dice rolling keep the marauding Austrian units at bay.  


 Okay and now onto the painting...Napoleonic French 10mm are up first
 
The latest French Battalion for "Napoleon at War" or whatever else I feel like playing.  (the unflocked one)

Brigade Commander.

Light Infantry progress for this battalion.  Not finished with them yet.


The Brigade in all its glory.  

The first Battalion - finished a few weeks ago
 
The Second Battalion WIP
 Next up?  The Canadians for my Battlegroup Overlord Authie Game (or Disposable Heroes, Bolt Action, etc)

They just need their detailing, unit patches, helmets etc, and flock

Bren Team.  Truth be told, I'm happier with my own version of British Battledress over the Vallejo BB.  Mine was a shade darker.

PIAT team

Rifle Squad.

 And now my unpainted (well they come prepainted but of course I'm going to repaint them) Israeli half tracks from POC.  These tracks are loaded up with MGs and kit from multiple sources.  These are the first Israeli vehicles I'm preparing for my upcoming Battlegroup: Sinai game.


Quality Casting Israeli trooper.  All my Israelis will be rebased individually for Battlegroup: Sinai and various other games. (Seek Out, Close With, & Destroy, Force on Force, FUBAR, etc)


Tuesday, May 12, 2015

3rd Generation Warfare & NATO/Pact Cold War Data Book

Excited to see a big Lulu box plopped down on our front step this afternoon!  I ordered a copy of Nick Ayres' "3rd Generation Warfare" and it finally arrived along with the NATO and Warsaw Pact Cold War Data Book.
Rule book and the NATO / Pact Data Book

 Both are soft-cover with drool-resistant glossy covers.  The rule book is a small, "cargo pocket" sized book that is less than 100 pages and the data book is a hefty, 200+ page compendium covering most of the nations of NATO but only the Soviet Union for the Warsaw Pact.  I was actually hoping the rule book would be a little bigger but I guess this makes it easier for me to carry onto the train to read, and also makes it a more convenient size for gamers.

The rules are packed with pictures of models and figures, as well as examples of play

 Upon first glance, both are impressive and thorough.  If you secured yourself a copy of the BETA rules, then you already know most of the features of the game and I will not talk much about mechanics in this post.

Lots of tables and also background 

 The rule book itself is packed with examples of play, which is good for a half-wit like me.  I will say I should probably have bought the black and white version of the rules since there is this annoying tie-dyed background on the pages.

The NATO / Pact data book has excellent national backgrounds and Orders of Battle.  (pictures are used without permission - please don't sue me!)
 A nice thing about the first data book ( I'm assuming the NATO/Pact data book is the first in a series of supplements) is the fact that most of the NATO nations are covered in it.  This gives you the options to play Cold War Gone Hot battles ranging from Norway all the way down to Turkey and Greece in the Mediterranean and most of the countries in between.  That's alot of ground to cover and ought to keep you busy enough until Mr Ayres publishes the next supplement???

The Data Book organizes its sections into National Background, OOB for popular units you would encounter on a modern battlefield, and unit composition to form combat teams and units to game with ranging from higher headquarters all the way down to infantry platoons and sections.

The back of the Data Book (T-80 not included)

I was also pleasantly surprised to find Quick Reference Sheets in the back of the data book.  Those are much appreciated because there are many tables you must reference during the course of a full turn.  There are also helpful appendices that will help with game play located in the back of the data book.

Overall, I'm pleased with the initial impression I've gotten.  Mr Ayres has published what looks to be a thorough account of WWIII combat and I'm looking forward to my first game.  What I like the most about the rules and first supplement is the fact that everything you need for a wide range of games is right in these two books.  If you are content with the European theater of WW3, then these two books are likely all you'll ever need.  This is one of the strong-suits of games like Fistful of TOWS III and Coldwar Commander,

Oh and per David's request, here is the link:

http://www.3rdgenerationwarfare.co.uk/#!rules/galleryPage


Monday, May 11, 2015

Battlegroup: 'NAM! Air Assault Part Two ENDGAME!

I concluded the Battlegroup: Vietnam game I had planned on playing for all these months with satisfactory results!  (If you have not read part I, read the post previous to this one for some background).

US Forces fought off a determined NVA assault as they left the Landing Zone (LZ), battleing for key terrain next to the road (high ground and a forest which the US forces were using in the defense).  If the first NVA assault succeeded, the US forces who had already moved out would be cut off from their LZ and subsequent reinforcements.  So part one ended with a US tactical shift after the defeat of the first major NVA push.  That battle resulted in the loss of an entire NVA infantry platoon, as well as about an entire US squad.
US Forces are Charlie Mike and the lead fireteam reaches "the blue line"
The US forces re-orient themselves on the cache locations on the other side of the creek and moved out, only to receive direct small arms fire in a "classic L-shaped ambush" from around the culvert and bridge area.
An NVA squad pushes hard across the road into the woods for a counter-attack!  

Sharp fighting breaks out at the creek between an NVA squad (right) and a US Fireteam (left).  The US team takes 2 casualties during the engagement.

the blue bead means the NVA have completed an order this turn.


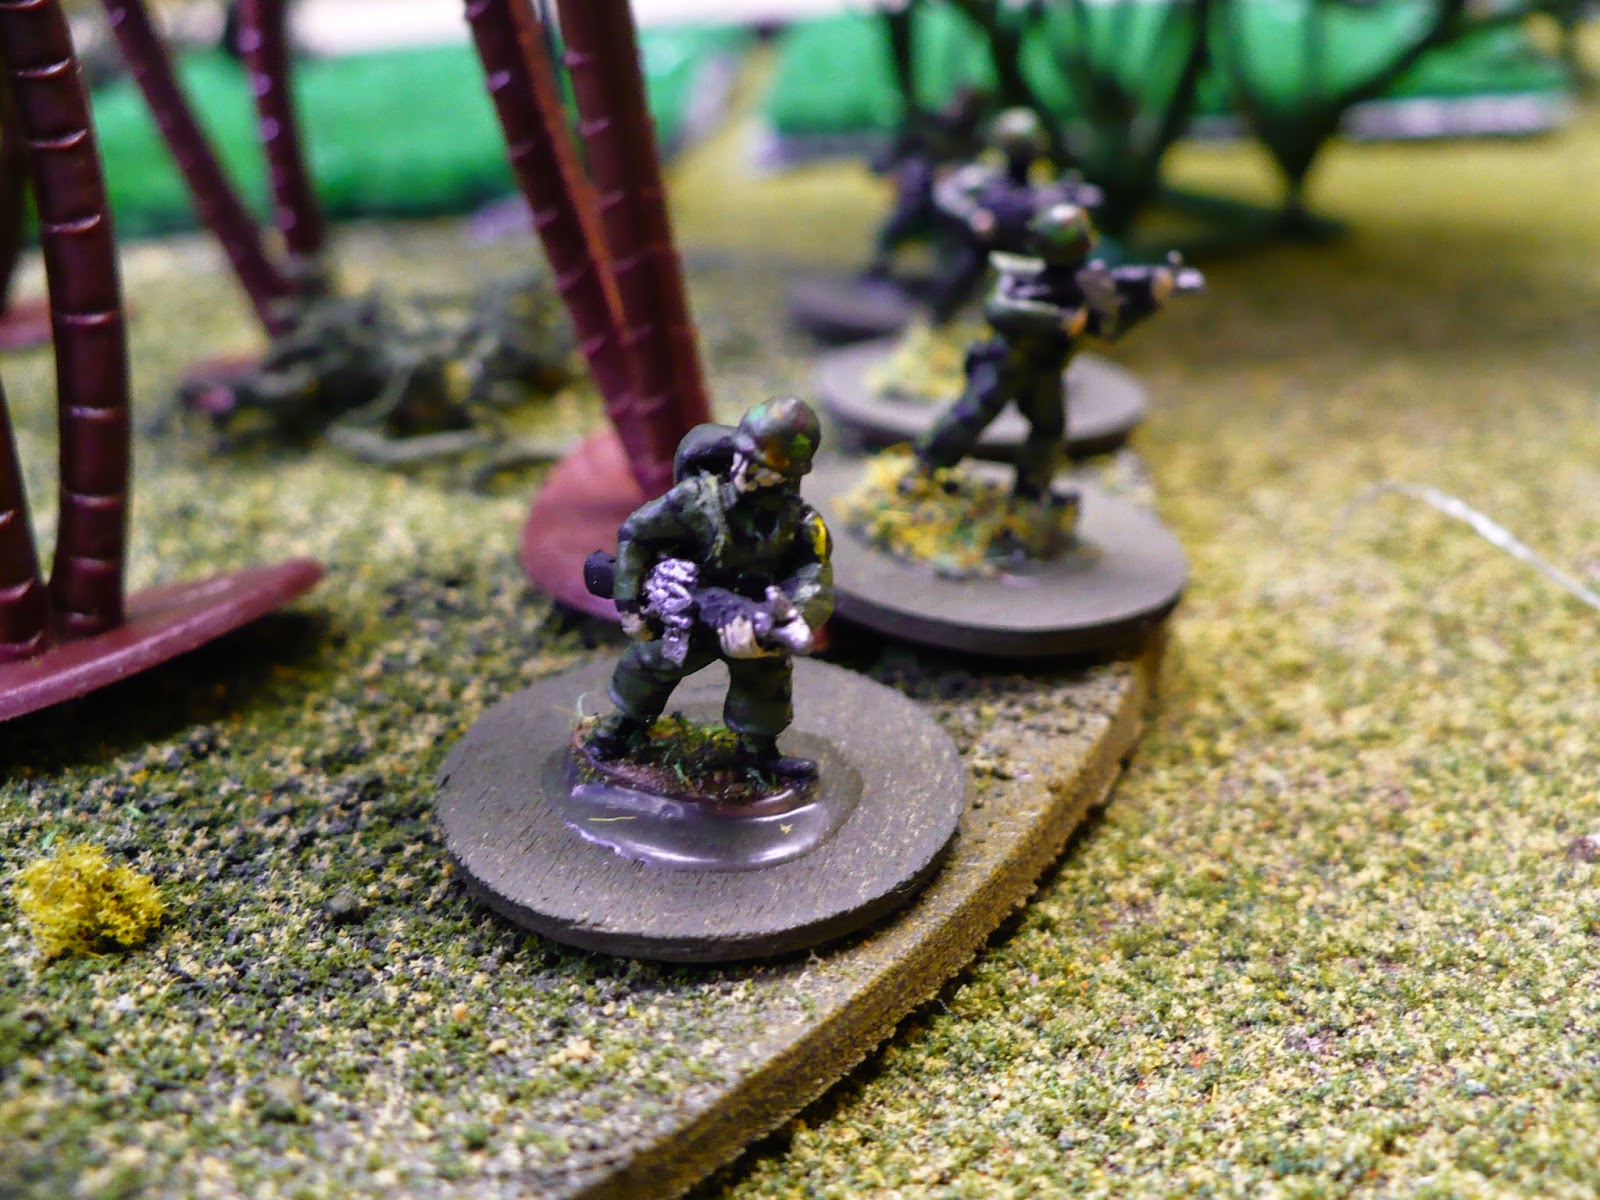
 "Uncommon valor was a common virtue" today as the lead US lead fireteam took heavy fire with 2 men down along the creek side.  The 2 remaining men stayed with their wounded/dead and returned such a hellish fusilade that the NVA squad beat a hasty retreat!  Reinforcements eventually showed up and finally the UH-1C gunship arrived at the scene to pepper the far bank and those pesky ambush positions.

US lead team in contact fighting for its life!  The return fire from these Soldiers, and the fire from the fireteam in the background was enough to drive off the NVA squad permanently., earning the team leader and rifleman a Silver Star.

US Platoon leader on the scene calling for the Huey Hog!

The NVA at the other cache site.


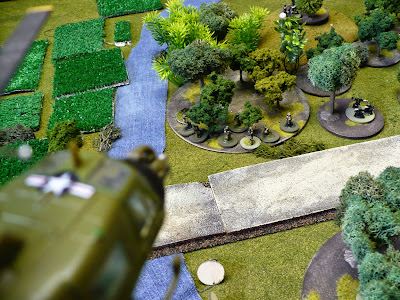
US Forces finally moving off the key terrain east of the LZ and moving towards the blue line.


US Forces moving out!

A lone US team guards the flank.  2 WIA with them.  They go on overwatch.

NVA casualties from the first assault 

NVA Forces in a firefight

"UGLY Two One is on-station - understand you have some work for me"  You can see US forces moving out in the left of the picture.

Need you to suppress enemy infantry in the treeline next to the road east of the culvert.

NVA forces beat a hasty retreat after their Battle Rating comes up.
 The loss of that one squad proved too much for the NVA and they reached their breakpoint of 18, ending the game.  That was a little disappointing as I really wanted to game the US sweep through the forests to find the caches, but without any resistance, the US force is unlikely to meet any more NVA troopers during the search operation.  This battle has ended!

ANALYSIS:

Excellent game.  As I've stated on many occasions, the Battlegroup system handles modern combat very well.  The uncertainty of the amount of orders you'll receive pretty much guarantees that you will not be able to move all the units you want to move.  You have to really think about what you want to push forward because they might be out there on their own without much support for a turn or two.  Can you afford that?

I was lucky that the US had such a good Battle Rating (21) and that they were primarily on the defensive for most of the game.  The NVA player launched counterattacks at every opportunity and that got him used up pretty quick. So there's a word to the wise...

This was a "Squad" sized battle, so it was tough on some turns to get all the orders to move the entire force where I really needed it to go.  The small teams that did get the orders, were fighting for their lives until "the Cavalry" (quite literally since these were 1st Air Cavalry troopers) showed up.

Speaking of Cavalry, let's talk about helicopters:

The helicopter gunship supporting the operation went through some metamorphosis during the game.  At first, I treated the chopper like a separate maneuver unit, able to fly around and blast things at will.  Well, from my own experiences, Air-Ground coordination is huge and friendly fire is and was always a huge issue.  Even today in a counter-insurgency environment, our AH's don't just go around blasting everything in sight.  So I restricted the gunship use to the following rules:

A ground spotter - leadership or the Forward Observer - must always have LOS to the gunship target, and a successful request for fire must be adjudicated.  This ensures that you don't have this helo tearing ass around the battlefield, shooting everything in its path.  There is at least some air-ground coordination required!  This makes its use much more restricted and in my humble opinion, realistic.

On Modern Weapons:
The modern weapon systems integrate very well with Battlegroup.  Assault rifles, recoilless rifles, RPGs, and even helicopters were able to operate without too much brain power (always a good thing) and Battlegroup has sufficient rules to accommodate these "new" weapons without having to change much.

I did notice that the hellish US LMG teams were constantly targeted by the NVA and with 2-man teams, this makes for a very short lived career on the tabletop.  In fact the US losses amounted to 2 x M60 teams, and 1 US fireteam in all.  (isn't there a quote out there about the life expectancy of a US M60 gunner during a firefight?  Or was that a second lieutenant?)  So maybe your squad's M60 teams should have 3 Soldiers in them.

Artillery:
The US Artillery was very disappointing, as was the NVA 82mm battery on standby.  While I only spent the points for 2nd Priority request, ostensibly both fire support units were on standby supporting the operation.  The only successful 82mm call resulted in a wild spotting round and cancellation of the mission, while the US 105mm heavy stuff never even arrived.

Here's what needs some work: the United States has always been on the cutting edge of Artillery "customer support" and the US trains most of its leadership and even soldiers on the call for fire.  Thus, the call for fire should be streamlined from the WW2 procedures and made somewhat easier given the distributed training and the much-improved communications.  (failing the commo test should really be a one time or two time deal for western armies if you're fighting past 1960).  Not even speaking to accuracy here.  I'm okay with the spotting round and Fire For Effect procedures, but the CFF should be a little easier.  I will work on that for subsequent versions.

Special Rules:
Paul OG and I have emailed back and forth about some of the US and NVA special rules and there are many!  Some of the rules I used in this game made the game very interesting, without making any one side too potent or dangerous.

Masters of Camouflage:  NVA player in terrain (not in the open) always counts his cover saves as 1 better.
US Call for Fire: All leaders, including Squad Leaders could call for Artillery or Helicopter Gunship support.

Ambush Placement: This worked well, although since the US player didn't arrive where the NVA player though he would have, it was moot.  More thought needs to be put into this rule, as I believe it is necessary for any Vietnam game if playing the NVA or VC, however it needs to be expensive as a squad popping up where you didn't expect them is a pretty big deal in Battlegroup.

Mines / Wires / Booby Traps: The US player as a matter of rule emplaced claymore mines on the defensive.  There should be a rule for this making claymores really, really lethal.  While this was a fairly mobile battle, I think some of my next battles could feature the famous (or infamous) claymore.