It's not always easy to get your hands on good orders of battle, which is why I suspect wargaming reference books will always have a place in this world. Luckily for anyone who is developing an Order of Battle for Hubbardton, 1777, the battle took place in an era when men wrote things down. The British Army of the period already have a halfway decent staff system in the mid to late 18th Century. The Continental Army was doing whatever it could to model itself after the British Army, and so we have officers who documented the returns from the fighting.
My first place when researching OOBs is always the George Nafziger collection, housed at the US Army's Command & General Staff College at Fort Leavenworth, Kansas, and available free to the world. (my link at right is broken since apparently the site moved.) Unfortunately for this lazy gamer, the collection only lists returns from a few weeks after the battle of Hubbardton, and even then only lists Brigade strength - not the individual Regiments of the Brigade. The British force list has no numbers until September, 1777. So this time the Nafziger Collection can't help!
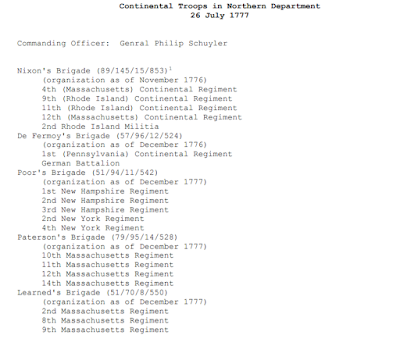 |
| Numbers listed are Officers / NCOs / Staff / Rank & File |

Knowing the per-stand strength in "Live Free or Die" to be 1 Stand = 50-75 men, we're on a good course. The paper from the Vermont Historical Society lists the British overall strength of Fraser's advance guard to consist of "22 companies (approximately 850 men) under his detachment." The Continentals also have a good approximation of their rear-guard force strength. As everyone knows, things aren't always as they seem and all of this data is subject to interpretations, so there will be fudging.
The foot notes clarify the strengths even better and quote the book "The Battle of Hubbardton - The American Rebels Stem the Tide" by Bruce Venter. The Vermont Historical Society paper then gives the overall Continental strength as: Hale 126 men present, and fit for duty, Francis 206, and Warner 99, for a total of 431; 110 were present, and sick, and 332 “on command” for a total of 883. Seven men were sick absent, and three on furlough. The rear-guard that departed Mt. Independence was about 450 strong; adding Hale’s, and Warner’s, 225 men plus some 300 stragglers, sick etc we arrive at a number of around 1,000 men at Hubbardton.
So I have the overall forces for the Continentals by-unit. Sort of. The numbers of the "Regiments" by their Colonels don't add up to 1,000 but addition of a generic "rear guard" of 450 comes close. The British were tougher to get specific strengths online, so I turned to the Osprey Book "Saratoga, 1777" and of course my old friend Ketchum, whose "Saratoga" is quite possibly one of the finest books I've ever read, period. More on that at another time. Ketchum puts the British strength at 2 x companies of the 24th Foot (assuming full strength that's 2 x 67 =134 troops), 10 companies of lights (10 x 67 = 670 troops), and 10 companies of Grenadiers (20 x 69 = 690 troops. The eagle-eyed among you will note the addition of "2" to the Grenadier Company. The extra 2 troops are fifers. I wonder if Grenadier fifers caught alot of flak from their messmates in a Grenadier company. Anyways, I'm not sure there were 10 full companies of Grenadiers or Lights because other accounts only list 4-5 company's worth of Grenadiers. So I'm digging into Osprey, but at least we have our max ceiling for both companies.
Anyways, our picture of the battlefield strengths is coalescing now:
Continental Troops (1000 roughly, all ranks)
- Rear Guard detachment 450 troops + (Since I dont have specifics I'll amalgamate these into the line units below, 150 each, this will make sense when we start assigning stands to units)
- 2nd New Hampshire (Hale) 126 + 150
- 11th Massachusetts (Francis) 206 + 150
- Green Mountain Boys (Warner) 99 + 150
British + Hessian Troops (900 troops roughly, all ranks)
- Combined Grenadier Battalion (Acland) Companies from 9th, 29th, 34th, and 62nd Regts (Osprey) 276
- Combined Light Battalion (Earl of Balcarres) Companies from 9th, 29th, 24th, 53rd, and 62nd Regts (Osprey) 335
- 24th Foot 140
- Loyalist Scout Detachment 100 (?)
- "Hessian" Forces under Freiherr Von Riedesel (Jagers, Grenadiers, Chasseurs) 1100 however in the interest of speed, (and according to Ketchum) Riedesel left the majority of them behind to keep up with the American rear guard along the military road from Ticonderoga the previous day. Giving us a Hessian force of roughly 100 Grenadiers and Jaegers. They'd arrive as the battle was coming to a close the following day. I think. We'll find out.
Stand and Unit Composition in "Live Free or Die"
The "Live Free or Die" Rules (LFoD) call for a stand strength of "50-75 men" per stand, along with overall commanders who are assigned "command points" and "stars" which enable them to assist units during the turn. I could probably fudge the stand values a bit (+ or - 5 or 10) and I dont think that would dramatically impact the game. I'd like to have units that were at least 3 stands as 2 wouldn't look quite as good but I dont want to mess too much with the mechanics of the game. Clearly the leadership values will be subjective so I'll have to assign them myself and I'm sure that could make many folks' heads explode on TMP...Perhaps I should issue a warning atop this post?
The unit quality is pretty well established from historical accounts and from the troop types present. LFoD gives us unit classes for each:
- 1st Class: Grenadiers, Light Infantry
- 2nd Class: Regulars, Continentals, Rangers, Jägers
- 3rd Class: Raw Regulars, Veteran Militia, Loyalists
- 4th Class: Militia, Indians & other Irregulars
Since by all accounts, St Clair (overall Continental Army Commander) assembled some of his best troops to serve as rear guard (see quote above) and based on the good accounting the units gave of themselves, we have to assume that as far as Continentals go, the American forces "aren't too bad". The 11th Mass and 2nd New Hampshire were both good units in their own right. That said, the men were completely exhausted. Warner made a controversial decision to bed down where he did instead of completing the additional 6-10 miles he probably should have gone. This allowed the British advanced guard to catch up with him the following day. Also about 1/4 to 1/3 of the force are sick and stragglers from the main body's retreat to Castleton. The men were hungry, tired, and nursing some of the slow moving stragglers. So I'm not inclined to be too generous when assigning the Continental unit classes... Anyways here goes.
Here is my fudged, totally unofficial OOB for The Battle of Hubbardton for the Live Free or Die rules:
Combined British Force
- Combined Grenadier Battalion (Acland) 1st Class, 5 Stands (remainder 25 troops)
- Combined Light Battalion (Earl of Balcarres) 1st Class, skirmish optional, 6 Stands (remainder 35 troops)
- 24th Foot 2nd Class, 4 stands (140 men from the unit and the 60 from the remainder pool above)
- Loyalist Scout Detachment (?) 3rd Class, 2 stands
- Hessian Forces Detachment (Baron Von Riedesel) 2nd Class, 3 stands (totally fudged this for unit composition)
- Hessian Reinforcements 2nd Class 8 stands
- BG Simon Fraser 4 Command Points, 3 Stars
- Major John D. Acland, 2 Stars
- Skirmish Line from Rear Guard, 2nd Class, 3 stands (skirmishers)
- 2nd New Hampshire (Hale) 3rd Class, 5 stands (26 remainder)
- 11th Massachusetts (Francis) 2nd Class, 7 stands
- Green Mountain Boys & Warner's Continentals (Warner) 3rd Class, 5 Stands
- Colonel Seth Warner, 3 Command Points, 2 Stars
- Colonel Ebenezer Francis, 2 Stars

Now in the "scenario coordinating instructions" component, we'll need to figure out just where and how all of these various units were used. That means that the positively huge Hessian "main body" may not actually make it into the fighting, same with the Loyalist Scouts! We'll also need to get clever as to how we assign victory conditions here. Clearly the British have an edge (as they almost always do in the AWI) but Warner's job is to slow them down, not stop them!
Steve, very enjoyable read …. this is such a fun part of wargaming.
ReplyDeleteAgreed. Research is an important and enjoyable part of the hobby.
Deletecheers, Norm glad you enjoyed the writeup. I sometimes feel as if doing the research and planning is more fun than playing the actual game!
DeleteThe research and background reading are part and parcel of our hobby and one that I find richly rewarding. Even with all the info available at one's finger tips, it is often the case that you need to fudge/tweak things here and there dependent upon the ruleset being used. What works for one rule set can often swing things too far one way with another. Certainly looking forward to more on this project:).
ReplyDeleteI couldn't agree more, Steve. I have been reading much of the afternoon away on all of my Hubbardton accounts. I want to get the scenario right and it's much fun!
DeleteThe fudging for me in this case is really tied to the table. I think a unit of 2 stands or 1 stand just wouldnt do on a table with many larger units.
Not to worry I'm really getting into the meat of scenario creation, now!
Excellent stuff Steve. It’s whetted my appetite. Maybe I’ll get my AWI stuff on the table after I finish Hohenfriedberg. My figures are more suited to the southern theatre but they’ll do. I don’t have any Hessians or grenadiers, so maybe time to place an order with Pendraken 😁
ReplyDeletethank you sir! Ironically I've been drooling over my SYW stuff and expanding the collection. I'm still wo seeing what rules to use and I've been toying around with a modified "blucher" with linear bases.
DeleteI need to go to the Pendraken site as I need bicorne French for the Eylau project. Who knows, I could walk away with more SYW stuff too!
There’s a mid-18th century set of rules from the same stable as Blücher (‘Maurice’). Never played either though. I highly recommend Twilight of the Soldier Kings for SYW if you don’t mind abstracted combat.
DeleteI have TOSK but I havent played it yet. I'm willing to try any rules!
Deletefantastic stuff - and excellent research. I love how you have pulled this together.
ReplyDelete...and making folks' heads explode over at TMP has an entertainment factor, all its own ;)
thanks Darren. the hard part is actually designing the scenario parameters! that's coming g up next!
DeleteA very enjoyable series, Steve. I agree that designing scenarios often requires multiple references to under stand the background, objectives, get a reasonable estimate of numbers involved and timing, and convert that all into a workable and enjoyable scenario. the last part is the most challenging, I think!
ReplyDeletewe are in total agreement, sir!
Delete