Monday, December 27, 2021

The Christmas Offensive: The Battle of Weiler, December 17th, 1944


28th Infantry Division, the so-called "Bloody Bucket" by the Germans

Ken was over yesterday to participate in a small slice of the action from the initial German assault during the Battle of the Bulge.  The action we played out specifically was the 26th Volksgrenadier Division's assault against Company I, 3rd Battalion, 110th Infantry Regiment, 28th Infantry Division on December 17th, 1944 against the town of Weiler.

Weiler occupies the left shoulder of the German breakthrough, the extreme right flank of the 110th IR's area of operations in December, 1944

Originally I wanted to use Crossfire to play this battle (loosely based on the Hit the Dirt scenario "Germans in the Woods") but I wasn't crazy about the "iffy" victory conditions in the scenario (EG if X happens, the Americans have done OK") and I had some issues finding balance in the scenario I was playtesting.  With a single company-on-company, the Americans won all 4 playtest games, even with the attached armor I gave the Germans.  I gave the Germans another company but then this turned out to be too easy for the Germans.  Am I being too picky?  Maybe.  Anyways I went with Iron Cross, which to me plays very similarly to Crossfire, albeit a bit more structured than Crossfire (I am still determined to find a good balance for this scenario and I am not giving up on CF)

Ken behind the American lines

26th Volksgrenadier troops at the startline!

It took Ken and I maybe 2 x turns to get back into Iron Cross to where we were playing it correctly.  Once we were "seasoned" again, we both started to play much more dangerously.  We played the "breakthrough" scenario and Ken played the Ami's.  My job was to get 30% of my breakpoint value into Ken's third of the table.  Given that we were playing the long way down the table, this was not going to be the pushover I thought it would be.  I was playing Volksturm from the late war "elite forces" OOB.  These conscripts must roll a D6 each turn to see how many actions they dont take because they're conscripts and have to be literally pushed towards the objective!

I attempted to be "cagey" moving behind cover and line of sight from the American MGs and mortars, which could reach my squads anywhere on the table.  Ken sends out a patrol into the woods to his front to investigate the sound of enemy armor...

Contact!  The Marder backs up with a successful reaction, but the American GIs know if they don't deal with this threat, their backs will be against the wall in Weiler.  The bazooka fires one round, damaging the Marder III.  The next round (another successful activation) seals its fate.  The accompanying infantry are firing against the GIs but to no avail.  The time table is slipping away!

The Marder burns while its begleitung infantry take cover in a ruined farmhouse

Ken fires mortars and machine guns at the German start line and immediately puts hurt onto the advancing VGs.  I decide to use the abundance of cover on the left, a beautiful tree-lined road, to leap-frog squads and MG teams forward.  (BTW, this strategy in my Crossfire test games worked very well until the Germans reached Weiler.  Let's see what happens!)

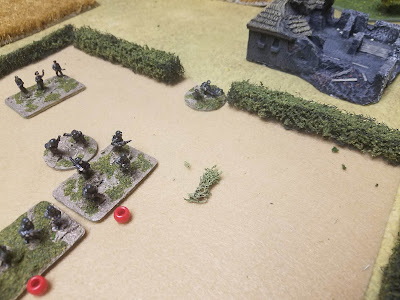
The second German Marder, some of the only Armor to actually cross the Our on December 16th, tucks in behind a high hedge.  The HE fire will be useful if I can get him into a firing position.  There are bazooka armed infantry squads to the west seemingly everywhere!  Where the hell are our MGs and mortars?

One of the things I'll say about Iron Cross is the intense focus on resource management.  Like in Crossfire with managing your possession of the initiative, in IC, you have to manage your limited number of activation tokens.  Any action costs one, whether it's successful in activating or not.  My mortar tubes remained silent for most of the game while I spent the tokens on advancing my squads and keeping the Americans' heads down!

The VG's reach the relative safety of the high hedge next to the Marder.  The Ami's can be heard shouting in english to one another!
More VG squads leap frog up the left of the road from wood copse to wood copse under furious fire from the Americans.  For the time, no HMGs are firing at me as they're all concentrated on the US left flank.  THe road to Weiler, while not open, seems to be the best way to get there.

Furious firefight breaks out at the Cemetery outside Weiler as US squads pour on the fire at the Germans in the winter wheat and along the road attempting to over run the town.

US Squads continuing to reinforce.  The blue beads are activation tokens.  The bazooka markers are simply markers (I use these stands for Crossfire also).

The Americans guarding the field.  The dark round markers are morale markers IE hits from fire.

The German "Base of fire" elements trying to keep the pressure on the US forces while I slide more troops up along the road.

This squad took a number of hits and activated twice

There is high drama along the Road to Weiler as my squads advance and immediately come under fire by Ken's GIs guarding the town.  It's time to bring the armor up!  Ken is moving more squads over to the town now.  Unlike Crossfire, there is a turn limit to this game.  6 turns for breakthrough with the possibility of a 7th turn.  I'm starting to get nervous.  While the German HMG moves up and starts putting more hurt on the GIs in the Cemetery, I'm not sure if I'll be able to move enough forces from my start line over to the left flank in time.  Too much dawdling!  

Eventually 2 of the US squads would be knocked out, along with the AT Gun.  THe Germans move up and flank the AT gun and are behind the US start line!

That D6 to their front is the US third of the table.  The start line!  We're gonna make it!

German HMG pouring on the fire against the Cemetery


The US Platoon Leader (called a "Sub commander" in IC) is one of the last fighting stands in the cemetery!

My last-ditch effort is to bring up the Marder III as the US is hurting in the cemetery (but there are loads of reinforcements behind them coming up!).  It's turn 6.

Heavily reinforced US left flank - locked down with HMGs and infantry!


The Armor comes clanking down the road moving past the cemetery...

At this point you're wondering how this drama on the table played out?  Well I had 3 German squads, 1 HMG, and 1 tank on the US side of the line.  20 BP points.  I needed 30!  I also had a whopping 5 squads killed by US fire.  The US forces weren't doing too shabby with 2 squads KO'd, and an AT gun knocked out.  The breakthrough that the commander, 26th VG Division needed would not be at Weiler!


Thoughts

This was a great fight - much fun.  I probably should have read up on IC more before we sat down to play (my playtest games were mostly Crossfire games this past week) so it took us a few turns before we re-learned how to play.  Once the knowledge was seated in our brains, we were dangerous again!  

I think in hindsight I should have moved up the left from the start.  Ken weighted the majority of his firepower against the large open areas in front of Weiler, but not the roadway.  With the other Marder III and a few more squads, I could have won the game, and the elements that actually crossed the line would have had more support when they got there!

While it's not Crossfire, I do love a game of Iron Cross played against a human being.  The back and forth becomes intense and each activation becomes more and more important as the game moves on.  There is a real sense of resource management and planning and a host of decisions to make each turn.  You are NOT sitting around waiting for something to happen.  Everything you do is a gamble - sometimes they pay off big time and sometimes they don't.  You see how forcing morale markers onto the enemy (IE hits) pays off when he tries to activate and shoot.  His performance degrades in front of your eyes to the point where he'll need to burn more and more tokens on rallying.  There is an OODA loop element to this as you carry out your plan.  As I starting throwing Germans across teh goal line, my immediate thoughts were constantly revolving around my next actions and his next actions.  Much like in Crossfire (a real thinking man's game IMHO)  you have to have a plan, use the terrain to your advantage and show up at where you planned your decisive point to be with overwhelming firepower.  If that's not the hallmark of a good game, I dont know what is.  Mission Accomplished!

As stated before, I'm going to continue to play Crossfire and I feel like it's quickly becoming my go-to set of WWII rules and hits all the marks I need it to hit.  I love that your platoons have their organic chain of command and that the location of the command stands matter.  I love the use of company level heavy weapons and battalion attachments and that you can decide where best to employ them, and most of all I love that Crossfire makes you think like a Company Commander, and analyze the terrain, fireplan, and continuously re-evaluate your plan.  In fact, in one of my Weiler playtest games, I used actual military control graphics (phaselines, target reference points, fire support planning, axes of advance and support, and templated enemy positions - just like my days in the Army - to draw out the plan.  Everything went perfectly well until contact was made!!!  Didn't Murphy say something about no Crossfire game plan survives first contact with the enemy?). 

Okay that's enough glowing endorsements from me today :)  I hope everyone is having a great week and that you got everything you wanted from Santa!  Here's to another year down, and another Christmas Offensive in the books.  

Now off to go playtest more Napoleonic rules...


Saturday, December 18, 2021

Planning Considerations for BIG Tigers at Minsk Games?

 With the big "Hill 80" Crossfire game still set up on the table, I went down to the gaming bunker early this morning before the family was up to play around with an open (non-gridded) game of Norm's outstanding "Tigers at Minsk," albeit with a Company's worth of troops on the table!  So how did this hairbrained-scheme go down?  What changes, if any, did I use?  Press on to find out!

The battlefield.  German 1st platoon (off camera on the left), 2nd platoon (middle in the wheatfield) and 3rd platoon (right) moving up to assault the village and seize Hill 80.

2nd Platoon massing in front of the hedge to move forward under fire

There is an old saying that "if it isn't broke, don't fix it" and that certainly applies to today's game.  Norm's Tigers at Minsk are an excellent, free set of World War 2 rules that put the emphasis on decision making and command focus.  Norm's scenarios are smaller-ish battles and my aim was to expand the scope of his rules to incorporate a company's worth of troops on the table.  What changes did I want to try?

Company Morale vrs Stand-Based Morale Breakpoint.  

Tigers at Minsk has a roughly 50% morale breakpoint that, when reached, forces every unit to check their morale, and continue to check as more casualties are accrued.  A company would equal 9 infantry "squad" stands, and 2 heavy weapon "HMG" stands equating to 5 or 6 for a morale BP.  What if you made it by platoon?  The German company consisted of 3 line platoons, plus a heavy weapons platoon.  Total would be 4 platoons.  BP would be reached when 2 platoons were out of the fight (Still 6 total stands, but it allows platoon formations on the table).

Platoon Leaders

Norm's rules use a command stand to represent Command emphasis, and where you plop your leader hex down guarantees one or two in-command hexes (units in that hex don't have to check command and may take an action).  For bigger games, placing the company commander seemed cool (the entire platoon, 3 stands, could be in command) and this is probably more in the spirit of Norm's rules.  My thoughts were to treat each platoon independently.  That is, each platoon had a Platoon Leader stand which could be placed touching a squad in his platoon, therefore enabling it to be in command (the other 2 squads had to test for command).  I also had a cool "guaranteed advance" rule, where the Platoon Leader was not placed with a squad, but if invoking the guaranteed advance, all 3 squads could move forward.  None could have any pins or opportunity fire markers on them to do this, and all 3 squads have to move, not just 2 or 1.

Company Commander

 Acts like the traditional leader stand in TaM and guarantees any action for any squad he touches.  My thoughts again to keep in the spirit with Norm's rules, you could forego Platoon Leaders and simply use the Company Command stand as the leader, but I like independent platoons.

Moving and Shooting Ranges

I allowed infantry to move 8" (for brevity) and fire to be 16" for 2D6, and 1D6 beyond.

These were pretty much the only changes I wanted to mess with today.  How did we get on?

Soviets defending the house - black bead is Out of Command

Using a "guaranteed advance" with the platoon leader, 3rd platoon moves up!

Soviet white beads were opportunity fire markers.  They did not score any hits and 3rd Platoon makes it to the cornfield!

Soviet HMG goes out of ammo!  In the spirit of Norm's rules, I selected a base target unit to assign the first hit, and since they were close (within 1 basewidth) to a sister squad, I assigned a hit to it as well.

2nd Platoon - their position for virtually the entire battle!  Red beads are "pinned"

So far, so good although with more units to command and more command rolling constantly going on, it was choppier than "regular" TaM and not quite as smooth.

1st Platoon working their way up the left flank behind the woods.  They are about to cross a Linear Danger Area between the 2 x copses

While the 1st Squad makes it clear, the 2nd squad is pinned by Opportunity fire!

On the Soviet turn, the Soviets take out a squad from 2nd Platoon with good shooting.

I also did not play with a time clock or events today, simply because I wanted to try the expanded command rules out.
German squad knocked out
Meanwhile the firefight on the German right ends up killing 1 Soviet squad but a second remains, stubborn as ever and not giving up!

Kill on the German right.


On the left, the Germans capture the woods and can see Hill 80 but are nowhere near close to assaulting it.  The Soviets have reinforced their right flank with a reserve squad and are holding the Germans for now.

So far the battle is going well.  It plays like Tigers at Minsk, albeit with more leader stands on the table (so way more units in command).  Not bad.  the Guaranteed Advance rule wasn't too overpowering (and by now there are so many pinned or out of command, or opportunity fire markers that the Germans couldn't use it most turns).

The advance really stalled as the Germans pressed an assault on their right flank against the Soviets in the woods but were repulsed by a pinned, lone squad!  I called the game.  Had I massed the German platoons a bit more efficiently (like the Crossfire Hill 80 game) this may have turned out differently.  Still I wanted to try out these rather "different" but similar command mechanisms to Norm's rules.  

So how did these "rules" work out?  The changes were, perhaps, unnecessary.  Command emphasis is probably better served with a single leader stand (and it gives you more decision making to ponder).  Additionally, the morale rules were the exact same amount of stands regardless of what was used.

I would probably only have out of command on rolls of 6 but otherwise the game is fine as it is!While successful, I will likely be sticking to "regular" Tigers at Minsk but this was still a very fun exercise. 

Next up on the table?  A Blood Red Skies game with Ken today, and more Crossfire coming up!  I would also say my loyal readers deserve a Napoleonic update to the rebasing project!  Lots of good stuff coming up so stay tuned!


Tuesday, December 14, 2021

Tuesday Night CROSSFIRE: Assault on Hill 80

More Crossfire "practice" albeit with more units on Tuesday evening when I sat down for a company-on-company game of Crossfire featuring a German "regular" company attack against a Soviet held farmstead and hill.  
Original copy of the rules.  Note the German columns on the left behind the wheatfield.  THe hill in the top-center of the pic is the German objective.  Overcoming the Soviet fields of fire would be a challenge.

Ukraine - 1941.  This outstanding engagement featured a 3 platoon German company with a heavy weapons platoon, fighting against an understrength Soviet "green" or conscript company of 2 platoons with heavy weapons distributed amongst the platoons.  Every platoon had a +1 Platoon Leader and both companies had a +2 Company Command Stand.

German Hauptmann and a small retinue of runners and NCOs.  Don't worry - you'll see plenty of his Soviet counterpart later in the battle!

The Germans are going to the left as the terrain offers a bit more of a covered approach and the Germans won't have to go into the teeth of the defense.  For this battle I'm experimenting with the use of the Company Commander elements, as well as the use of a heavy weapons platoon, commanded by the Company Commander.  In Crossfire, Company Commanders and set up "Crossfires" with HMGs, so 2 x HMGs in a round of fire is going to be nasty for whomever is on the receiving end!

For this game I'm also trying out the use of artillery, and the Germans have 12 x 105mm fire missions, which turned out to be extremely useful for their 4 smoke bases they can lay down.

German platoons getting into position to assault the small hill and flank the Soviet defense line

Moving through the woods to assault!
The German 1st and 2nd Platoons move into the woods on the left and the 2 x Soviet Squads posted to guard the flank immediately open fire with both missing and going NO FIRE!  The Germans drop smoke across the font and immediately move one of their HMG stands along with the Company Commander up.
Smoke drops to their front.

The Germans have to flank the frontline trace so they drop smoke in such a way that the fewest Soviet stands have line of sight to the woods they're jumping off in.

Big picture.  Note the German platoons in the woods, the smoke, and the German platoon in the wheatfield.  The Soviets are aligned across the front still but the Soviet commander is going to do something about that!

As the Germans move up to cross a linear danger area, they take fire and are pinned.  

big picture - the Germans want to assault the small hill but are waiting for the right moment when the enemy is suppressed.

The fight expands across the Soviet trace as Germans open fire against the Soviets in front of the house and attract the attention of a Soviet HMG...

Soviets in the cabbage patch - an HMG and a squad

The Germans fail to suppress any Russians, and the Soviets return fire with a "firegroup" using the HMG and the squad in teh cabbage patch.  3 x 6's!  A kill and a German squad goes down.  Soviets seize the initiative.

THat's a kill in Crossfire

One of the platoons is led by the Commissar

The Soviets filter their left platoon around behind the frontline trace to guard the hill as it's obvious the thrust is coming against their right.  The Russians take a covered and concealed route through the orchard behind the house overwatching Hill 80.  The Germans are able to clear the small hill with fire and occupy it, their Hauptmann pushes the smoke screen further back to allow to flank and assault the cabbage patch!  The Germans focus more fire on the cabbage patch and dispatch the HMG section there.  More back and forths in the firefight eventually goes the Germans' way and sensing the moment is right - they assault, beating the suppressed Soviet rifle squad there.  The Soviet overwatch squad behind the cabbage patch pins their supporting squad coming up and the assault element and Platoon Leader go in without the second squad.  The Green, Suppressed Soviets are at a huge disadvantage in this combat and lose the fight.  Taking the cabbage patch assures complete freedom of movement on the German left.


Bringing down the cabbage patch.  the hill to the left has another German platoon waiting to assault

The smoke clears at the beginning of the German initiative and they're aghast to see an entire Soviet platoon in the open crossing the gully between the cornfield and Hill 80!  The Germans already have the Heavy Weapons platoon and an infantry platoon atop the small hill.  They open fire.


Kill after kill and this turkey shoot sees almost the complete destruction of a Soviet platoon caught in the open.  It's one of the most dramatic turns of the battle.

Meanwhile in an act of desperation, the Soviets assault the cabbage patch with another squad from the second platoon.  
Soviet reserve squad assaulting the cabbage patch!  It becomes suppressed on the way in by the German squads.

The German squad on the right then becomes suppressed when they go to assault the Suppressed Soviet squad!  The assault is called off!  THe Soviets fail in rallying the Suppressed Squad and the Germans assault again, knocking it out.  

Germans preparing to assault Hill 80 from the Orchard behind the house

Assaulting Hill 80!
HIgh Drama as the Germans assault Hill 80 and are knocked out by the Soviet COmpany Command Stand!  Tough SOBs!

German squad was suppressed in the open trying to assault the Soviet Company Commander.  They'd be knocked out by the same squad in another round of fire.


launching another assault at the hill!

Hill 80 cleared.

This battle was tremendous fun and really demonstrated the versatility of the Crossfire Rules for me.  You have to be thoughtful about your strategy, and you have to read and use the terrain like your military counterparts.  I also appreciate that the entire infantry portion of the game can be played with a single QRS.

I love that Crossfire produces some moments of high drama and considerable tension and I've taken pictures of where some of those extraordinary events took place during the Battle for Hill 80.  THis was a bigger battle than my previous Crossfire Practice and I plan on playing more including battles with armor, and some battles within built up areas.  It's going to be fun!

The Cabbage Patch - where the Germans launched a bayonet assault, and where the Soviets launched a desperate counterattack of their own!

The orchard.  The Germans pushed through these woods and launched their first assault against Hill 80 and were repulsed with heavy casualties by the Soviet Company Command Stand.

The clearing where the German squad was taken out by the COmpany Command team

Heavy Weapons Platoon - the MVPs of the battle for the German side.