Sunday, September 27, 2020

The Battle of Hubbardton 1777 with Two Flags - One Nation!

 I've been shopping around for a good set of rules for my upcoming Germantown 1777 MEGAGAME in December.  Having considered a bunch of open and hex-based games, I had an idea about testing Norm's outstanding "Two Flags One Nation" ACW rules, but for AWI instead.  

I spoke to Norm about some of my ideas for moving TFON back about 90 years and Norm offered excellent guidance and thoughts for keeping TFON in relatively intact and unmodified status.

Since this would be a test game, I decided to focus on one of my old favorites from the Saratoga Campaign - the Battle of Hubbardton!  I have been to the site of this classic AWI rear-guard action countless times, having attended Military College about an hour from the site of the battle, Hubbardton offers a battlefield enthusiast and history nerd the opportunity to spy all aspects of the battle from the same vantage point.  And with really only about 7 units participating in the direct action, a perfect chance to put TFON through its American Revolutionary War paces!

Looking towards Monument Hill, the Lights are formed and awaiting the order to advance.  Behind them are the Grenadiers and 24th Foot marching down the "Old Military Road" from Ticonderoga.

Setting the Stage!

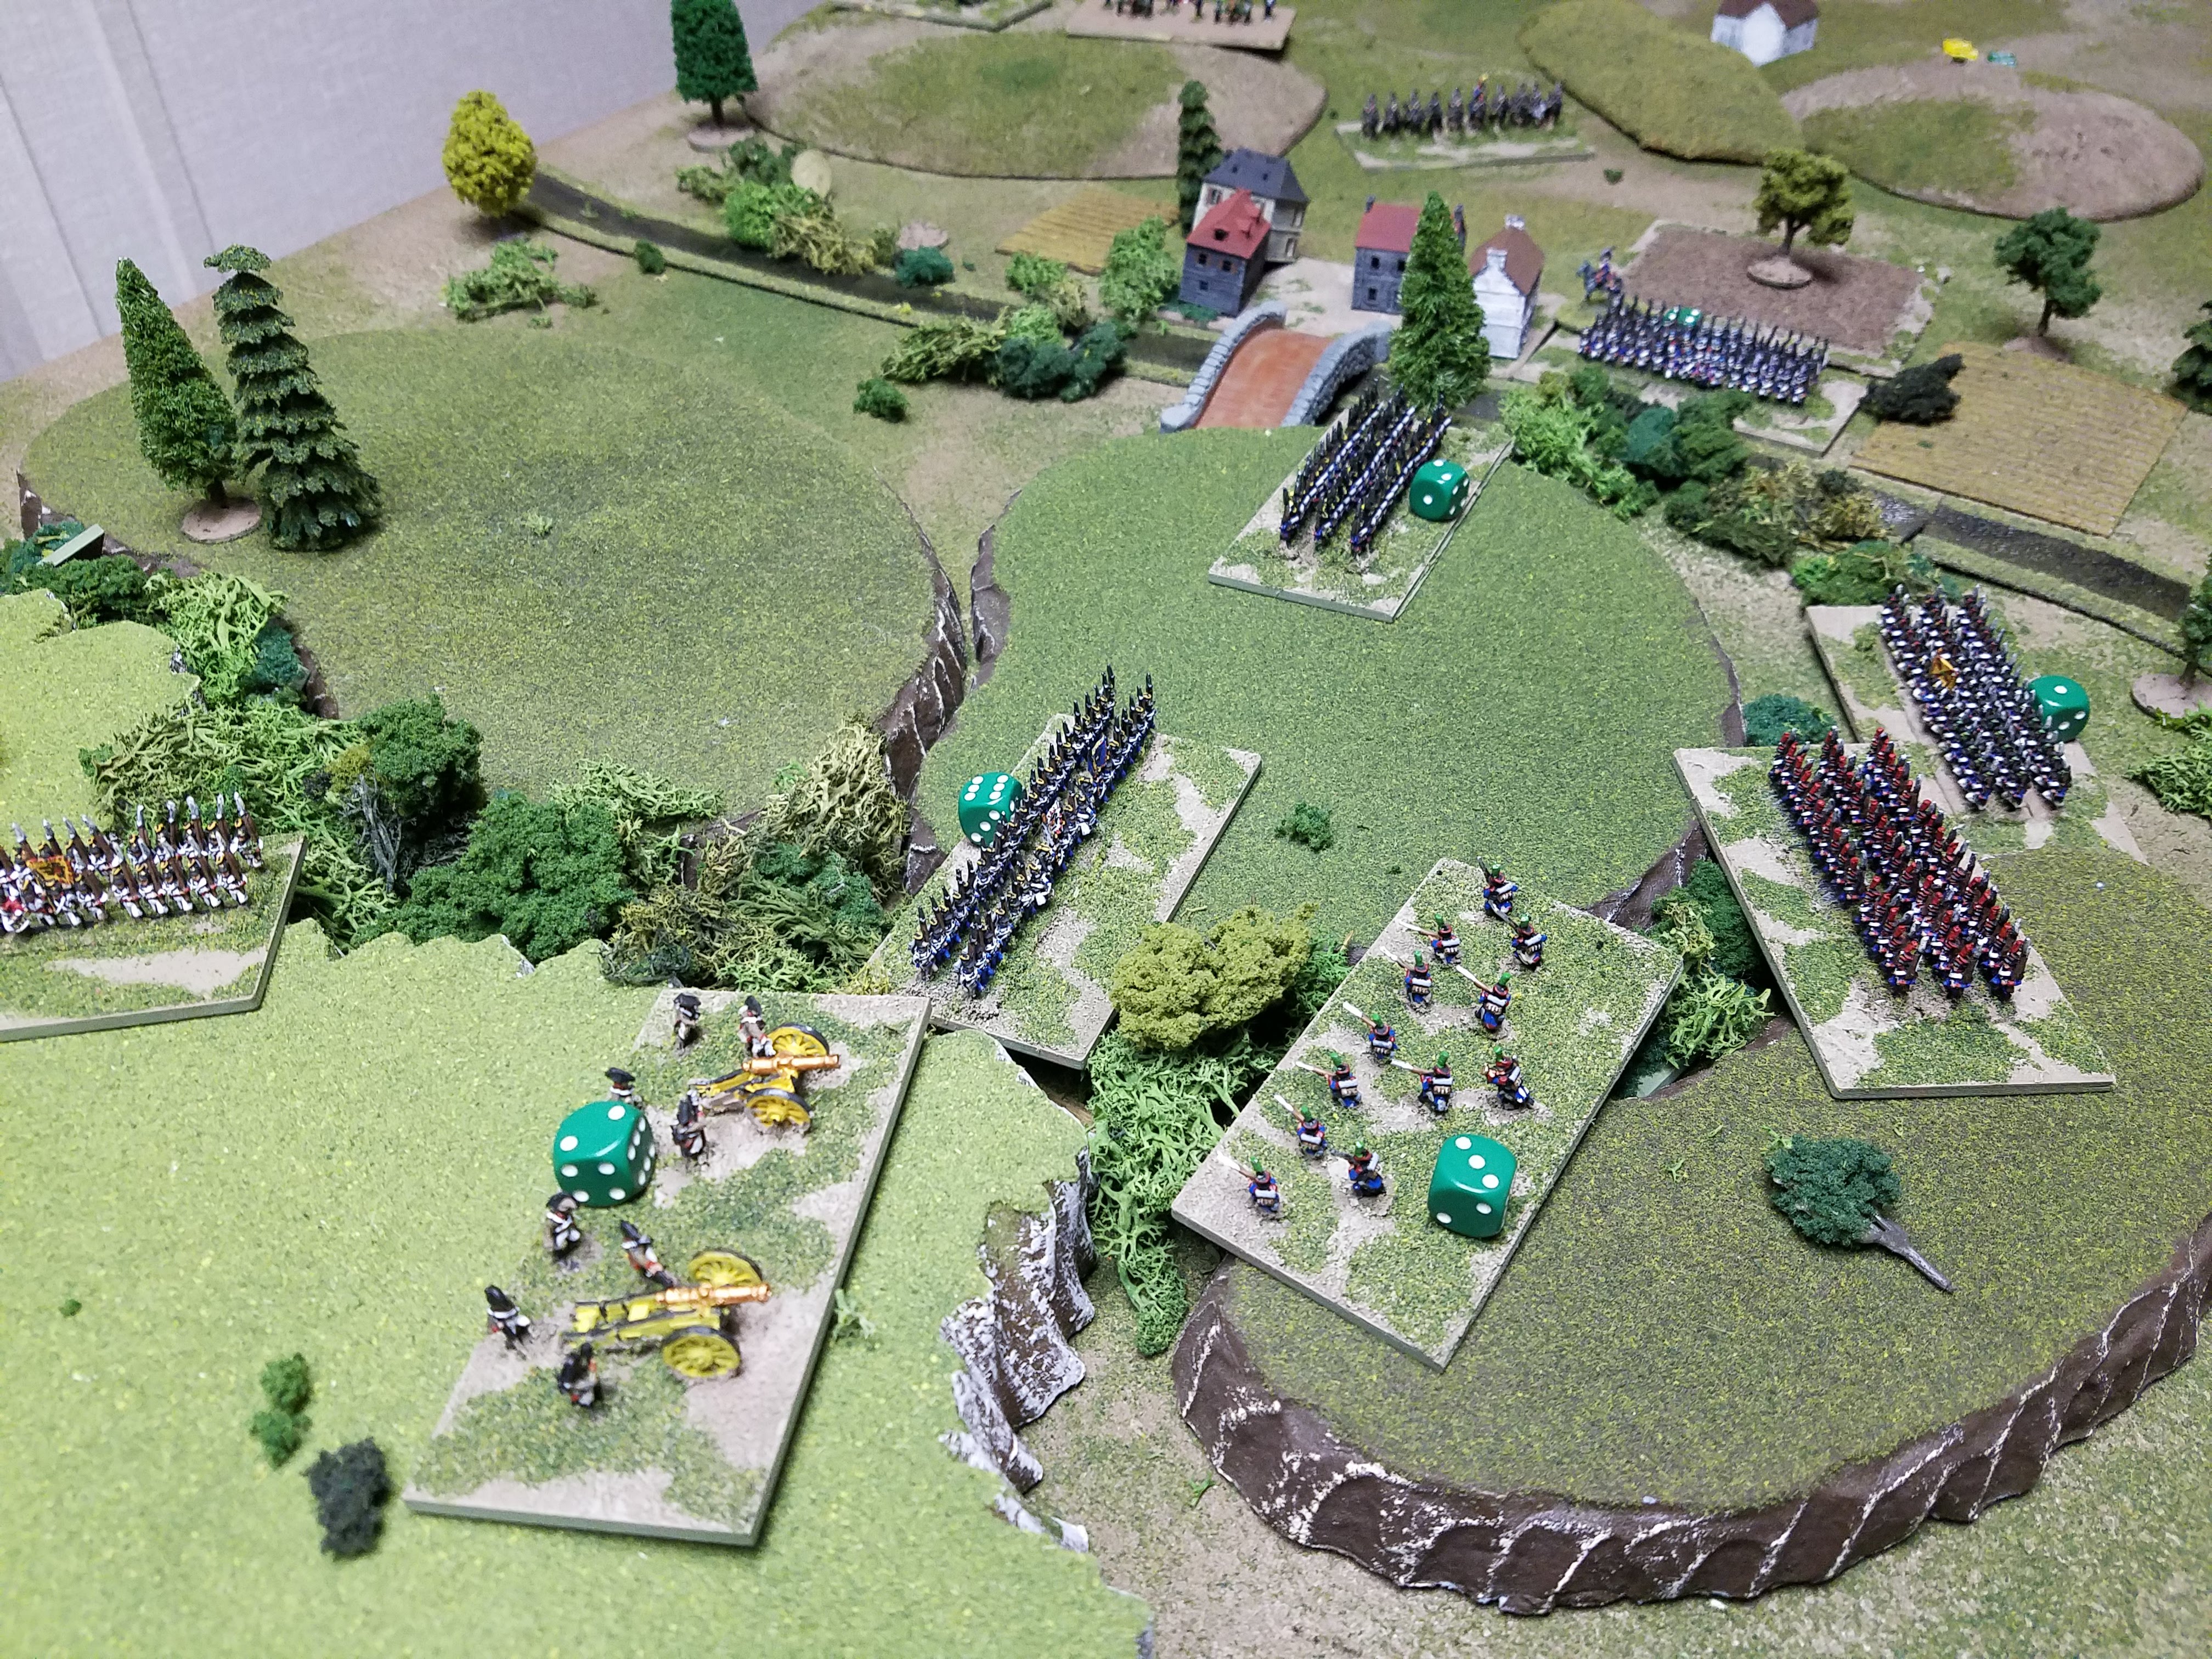
The Battle starts following an initial skirmish between Continental pickets and British lights, which alerted the main Continental force encamped on Monument Hill.  By the time the British advanced guard under Brigadier Simon Fraser reaches the base of the hill and the clearing in the valley, the Continentals were formed up and awaiting their advance.  The Continentals consist of 2 solid line units - the 11th Massachussets Infantry and the 2nd New Hampshire Infantry, both under veteran commanders Colonel Ebenezer Francis and Colonel Nathan Hale.  The third element is a force of Green Mountain Boys under grizzled and veteran commander, Seth Warner.

The British advanced guard is charged with maintaining contact with the Americans retreating from Ticonderoga, and consists of crack units of converged Grenadiers and converged Lights, the 24th Foot (South Wales Borderers), Canadian Riflemen, Jaegers, and Brunswick Dragoons (wearing heavy iron-shod boots and with no horses).   The Hessians will arrive halfway through the battle as reinforcements and Baron Von Riedesel will accompany them!

The Battle is Joined! 

Turn 1 No Random Events


Turn one the Lights begin at the base of Monument Hill deployed in line and advance to skirmish with the 2nd New Hampshire.  The Grenadiers and 24th march down the "Old Military Road" to Castleton to the sound of the battle and reach the base of the hill.  BG Fraser is the "Division Commander" stand.  Major Acland, commanding the Grenadiers, is the Brigade Commander.

24th Foot marches behind the Grenadier Battalion along the Old Military Road to "Ti"

The 2nd New Hampshire fires and scores 2 hits on the Veteran Light-Bobs, who pass their capability test.  

The 2nd New Hampshire (upper right - blue colors) lower muskets and fire on the Lights!

Turn 2 No Random Events

The Lights deliver covering fire against the 2nd New Hampshire, who are occupying a stone wall and I'm counting that as cover for them.  Only 1 hit is achieved.  The Grenadiers and 24th form lines and advance.  The plan is to simultaneously give a volley, a "halloo" and a bayonet charge against the Americans with the 24th on the left, lights in center, and Grenadiers on the right by turn 4.

Converged Grenadier Battalion moves up behind the Lights - who must move to their left into the wooded copse

The 24th Foot positions itself at the base of the hill!  Things are about to get very dicey for them.

The Green Mountain Boys under Warner fire into the 24th, while teh 2nd New Hampshire keeps up a steady fire against the Lights.  The Lights ALMOST fail their capability test if it wasnt for Fraser keeping them in the fight.  This is NOT the pushover the British thought it was going to be.  

The 24th Foot falls back in the face of withering fire from Warners band of Vermonter ruffians, failing their capability test.  Major Acland or General Fraser will have to ride over to offer the seasoned troops encouragement.

Turn 3 British "Up and At 'em Boys Lads!"

Fraser, seeing the 24th Foot fall back, rides over to stem the tide of men flowing back to the road.  Major Acland, relieved, rides back to his Grenadiers, eager to jump into action against the Americans.  The Lights take their position in the central woods, and overall it seems as if the assault can start soon.  The 24th with Fraser's presence, rallies and reforms at the base of the hill.  The men's pride has been dented and Fraser urges them forward to reclaim as he calls it "the King's hill." 

The 2nd New Hampshire pours fire into the Grenadiers now and forces them back!  They fail their Capability Test, even with Major Acland present.  A musket ball singes the small hairs on the back of  Acland's neck but doesn't hit the Major (rolled a "10" on the leader casualty test).

Turn 4 British Have Confused Orders!  

The British Light Battalion is moved back 1 square behind the wooded copse, their commander misinterpreting a courier's order from Fraser, who sees the Lights leaving the woods in good order.  

Light bobs moved back.  Grenadiers have 6 hits already!

Fraser curses under his breath but maintains his composure.  The green-cladded men to his front look like militia.  "The 24th will charge, Colonel.  Please deliver that position for me immediately"  The 24th Foot's commander nods and barks "CHARGE BAYONETS!"  The men of the 24th, eager for payback against the Green Mountain Boys, lower their muskets menacingly and there is no doubt as to their intention.  Warner spies the disorderly and loosely formed redboats lower their muskets and pleads with his men to stand and lay on the fire.

The 24th passes their capability test as do the Green Mountain Boys.  The men advance up the steep slope in the tall, waving grass at a doubled pace, their NCOs having a hard time keeping them together.  Contact is joined at less than a murderous 25 yards as the British can make out individual stones and shrubs masking the Continental positions.  Smoke from muskets is heavy in the air but a calm morning wind is pushing it east.  The 24th fires and charges in - which is too much for the Green Mountain Boys.  They run for their fall-back position, already having been identified by Colonel Warner the night before.  The Continentals know exactly why they are here - not to win the fight, but to slow down the British and give Saint Clair's men time to reorganize the Army.  The Vermont militia men leave their dead and dying on the hill in order to keep their force together.  A woods and fenceline is the next position and the men run right for it.  As the 24th carry the hill, the're greeting with militia men, men wearing dark blue, and light blue coats running everywhere.  the 24th can scarcely be called a regiment and the officers know they must reform.

24th carries the position!  Both they and the Green Mountain Boys are disordered. The 11th Mass will pull back off the hill with the 2nd New Hampshire anchoring the American position.

Seeing the Green Mountain Boys fall back, Colonel Francis orders the 11th Mass to pull back to the fenceline and the 2nd New Hampshire to remain and cover them.

Turn 5 No Random Events

The 24th's victory in gaining the position from the GMB puts them out of contact (out of command and control) with any couriers or the commander and all they can do is watch as the GMB reform on the opposite side of the hill.  They note the blue coated 11th Mass marching orderly down the opposite slope to a small farm.

Simon Fraser moves to join the 24th atop the west side of Monument Hill and the Grenadiers advance back up the slope, their unit taking the majority of the 2nd New Hampshire's vicious fire, they would end up evaporating as a military unit this turn.

Grenadiers evaporate after having clawed their way back up to the line under heavy fire.

I went on to play another 6 turns of Two Flags - One Nation (or maybe, Thirteen Flags - One Nation? haha) with the Hessians arriving almost the same turn the Lights quit the field as well.  Some notable things happened during the game.  General Fraser was killed trying to rally the light battalion, about 4 months before his actual death at Saratoga.

The death of General Fraser
The Hessians flanked the American positions, just as at the real battle.  The arrival of the Hessians signaled the start to the Americans that they should pull back - their mission having been achieved.  To be honest, I didn't think hard about the victory or end game conditions, I just wanted to test the game and the feel of the game out in a setting taking place 100 years before the rules were published for.

View from the Continental position just at the Selleck Farm where the Continental line fell back to.  Note the 24th Foot on Monument Hill with the Hessians behind coming up.

Seth Warner was pleased with the performance of his men today.  It doesn't mean they'd actually be paid, but they acquitted themselves well.

Baron Von Riedesel urging his men forward through heavily wooded and hilly terrain.  The Hessian arrival made a crucial difference in the real battle and in this one.

Thoughts

Long post, I know - but I'm making up for my absence of late1  Right off the bat I have to say that TFON is not lacking in period feel or excitement.  It worked perfectly well for an AWI battle and the engagements between the Regiments really come alive.  The action unfolded exactly as I had read about and this game really made me sense the frustration of the British and the desperation of the Americans.  Here are some more thoughts and analysis if using TFON (thirteen flags!) for an AWI battle as big as Germantown.

Playing with Squares

Should be pretty simple but I ran into some issues with supports, retreating, facing, and attacks.  I'll have to work this out a bit more if I'm going to play one a gridded/squared table.

Should charges be allowed diagonally?  Or only through the face of a square?  Shooting attacks are allowed diagonally.

If I am a charger, allowed to move 2 open spaces to make contact, may I move into 1 space diagonally, change facing 90 degrees so as to face an enemy square, and then charge?  Or would that constitute 2 moves over 2 turns?

Morale & Troop Quality

The morale rules are subtle, but critical, and unit status and morale must be managed by the commander.  At no point in this game did I feel like I was trying to stuff an AWI Soldier into an ACW pair of pants!  The morale rules definitely supported that.  I should have used "elite" optional rule for units to give the Grenadiers and Lights some more of an advantage (in real life the Grenadiers were handled roughly by the 2nd New Hampshire who clubbed their loaded muskets and feigned surrender, just to unleash a volley at murderously close range).  They fought back with a vengeance, eventually driving the 2nd off.  Otherwise the morale and troop quality was perfect.

Brigade Cohesion

I did not use the Brigade Cohesion rules but I probably should have.  That said, with the Close Combat rules, they are probably some of the most involved in the rules and so for a large, multi player game, I wonder if they'd be too much for about 4 or 5 guys to use during a game.  Also with smaller brigades of 2 regiments each, would they be too significant?

Weapons and Fighting

The shooting and melee rules were perfect.  For Germantown, I'd need a way to represent "small" units and that is in the TFON rules already I just didn't use it this time, but every AWI battle has skirmish type units lingering on the flanks or patrolling (think Queens Rangers, Loyalist Bands, Jaeger detachments, etc).

Events Table

I had alot of fun with this.  While I used the generic events table from the TFON rules, I was brainstorming up some of my favorite AWI quotes and moments and propose the following:

2: Clubbed Muskets!  American unit may move 1 space and fire

3: We can hear the Hessian bastards singing!  British player selects an American unit to take a capability test as if it was fired upon.

4: Flying Column - a unit in column may move 1 extra space regardless of terrain

5: Charge your Firelocks!  Unit may reroll a missed shooting die this turn

6 through 8 No Event

9: Forward! Forward my brave fusiliers!  British receive +2 to Charge Test

10: For Shame!  For Shame, Light Infantry!  I never saw you retreat before!  British lights may rally off 1 HC 

11: Oh Fatal Ambition!  One side's Division Commander mortally wounded & removed from play

12: So they'll remember us!  Continental unit receive a +2 to Charge Test

I hope you enjoyed reading this as much as I enjoyed fighting the battle and posting.  As an update - I am literally 1 Continental unit away from completing the AWI project once and for all!  A project that started in 2004 will finally have the block checked!  Hopefully you will see that unit, and my entire Continental Army and British Armies soon!  Huzzah!

Monday, September 21, 2020

The Battle of the River Mius 1943 with Rommel

 Ken and I played through a full game of Sam Mustafa's "Rommel" over the last 2 x weeks, making this a truly celebratory post as we successfully played through turns 1 through 8 last week and completed 9 through 16 this past weekend.  We played the "River Mius" scenario from the outstanding  Hexes and Miniatures website, which I will link to on the right side of my blog.  This post is part battle report, but mostly a collection of our thoughts on the game.

Soviet HQs/ Supply Source - Made for Rapid Fire as the 307th Infantry Division CP

What Happened?

The Battle takes place in Ukraine, 1943 along the Mius River with the Soviets making post-Kursk drives attempting to take advantage of an off-balance German Army.  Both sides are well-equipped for this titanic showdown and we fielded the better part of 2 x Divisions on the table (Rommel is an operational-level game where stands are companies).  I felt that the OOB lended itself nicely for beginner play (and conveniently I had all of the elements in the OOB painted and ready to rock and roll).  The Germans must hang on to two of their objectives, and capture 2 x Soviet objectives.  The Soviets must hold 4 objectives, and 1 of those objectives must be a German one.  The stage is set!

Germans coming from the right - Soviets the left.  I used flocked pennies to mark the grid - yellow dice are German objectives - Red dice are Soviet

Three units are allowed in a square.  Units of the same "element" such as brigade, must try to fight together or they are penalized.

I sent my units forward very aggressively along non-supporting axes to try and dislodge Soviet battalions (squares with 2 or 3 stands) from their objectives. I found out the hard way that armor should not fight in a city without support, nor should they try to move through forests without accompanying infantry.  Rommel has a really neat combat system that kind of works like a boardgame (the whole game really almost feels like a boardgame).  I have to say infantry really is the centerpiece of the game, as it probably was the war.  Your armor is always sexier, but your infantry have tremendous staying power and attacking power. 

I have to admit that it's easy in a board wargame to overlook the infantry especially when you have armor and mech battalions, but in Rommel you cannot make that mistake.  You're forced to use combined arms attacks if you want to make any dents in enemy positions.  You'll also need to set up 3:1 odds to dislodge an enemy - something a textbook or field manual once told me when i was a cadet.

Armor in a city fights at a disadvantage but this was a first game!  I regret nothing!  ATTACK!

It's easy to be surprised in Rommel at just how good your German armor is, until you end up losing it all if you're not smart about conserving it!  German armor units are incredibly powerful but you'll never have enough of them.  Ken played very smartly with his armor and was able to commit his armor where he could make a breakthrough, which I'd argue he almost did in the center but we reached the end of the game. In this manner, the game forces you to have a plan and to think.  I'm quite sure I've never played a wargame quite like it and I am looking forward to playing again, albeit in 6mm.


One of the really neat things about Rommel though, besides the combat and the scale, is the ability to "buy" tactical options and events.  This, we felt, really imparted nice WWII detail to the game and added to the narrative.  For example, when assaulting in the city, I purchased, for 1 Operations Point, "flamethrowers" which allowed me a +1 column shift when assaulting in an urban environment.  It's things that like that make the game even more fun and add an element of tension/gambling as you don't know if your opponent will spend an op to purchase a defensive tactic.

Look at that massive armored force going into the attack!  This would make an excellent game to fight out a big battle during the Kursk or Bagration offensives

A huge tank battle! 
As the action unfolded, I found myself struggling to capture objectives that were seized by Ken's Soviet infantry - 2 x companies or stands worth of troops holding against 3 stands attacking with modest artillery support.  As I learned throughout the game, if you want to breakthrough and capture an objective, you have to be willing to "pay" for it in terms of spending Operations points to buy subsequent tactical phases and throwing in fresh troops to set up multiple attacks against the objective.  Literally needing almost 3:1  advantage to cause the kinds of hits you need to destroy enemy units, otherwise you'll find yourself in a grinding battle of attrition that a professional army most dreads (and one that the Germans are not suited to winning).

Took me the whole game to take this objective and it took me attacks with almost 9 stands! 

Ken focused his efforts on capturing 2 German objectives - on my left and in my center and his generous use of artillery and fresh reserves earned him a hard-won victory.  As fpr me, I learned what it takes to fight and win as a WWII general on a WWII battlefield.  Rommel gets you that close and puts you in the command post of the Army headquarters, making decisions about where to attack, how to attack, and what your fireplan is to support your attacks.  I cannot say better things about this game!

Desperate German armored attacks going in!

Soviets trying to overrun a German objective!

A Soviet breakthrough effectively surrounds a German objective!

Anyone who reads my posts knows how much I like the narrative or storyline created by a wargame.  Wargames that have clever mechanisms and features easily create that narrative and I think that's something I appreciated so much about Rommel, that and it caters to my megalomania of being able to put an entire battle on a 6 x 4 table!  Just needs 6mm forces or 10mm forces as I think it would look much better.  Both Ken and I really liked and appreciated the game which I think delivers on its goals and promises.  If you enjoy WWII history, you should purchase or borrow this game, read it and play it - you owe it to yourself!


Monday, September 7, 2020

The Battle of Wagram: Day 2 Center - Oudinot's Attack

My buddy Alex was over Sunday night for some Napoleonic gaming goodness with a tiny slice of the Battle of Wagram on the table.  I haven't seen Alex since pre-Covid days and it was good to get a game in with him. 

For the battle, we used a scenario from the Michael Hopper Shako 1809 scenario book (Blood Along the Danube) and literally singled out a 2' by 4' sliver of battle featuring Oudinot's forces under Grandjean assaulting the heights beyond the Russbach and Baumersdorf.  

The entire battlefield to the right - two feet wide and 4 feet long.  The Russbach divides the setup areas and the heights are clearly visible.  Baumersdorf on the French side guards the bridge which Cavalry and Artillery need to cross.

We put the venerable Eagles Cheaper than Brain Cells through its paces with another historical matchup, and I also got to use my singly-based Napoleonic 10mm stands, which turned out pretty nice if I do say so myself!

The French, with 12 units, will receive 2D6 orders per turn while the Austrians will receive 1D6+2.  The French have 12 units and the Austrians have only 8.  The French set up beyond a low set of hills awaiting the order to commence the assault.  The Austrians are up on the high ground awaiting the attack.

Red dice are orders for the Austrians.  Blue dice are orders for the French.

Opening the game, Alex pushes all of his artillery atop the hill overlooking the valley and the Austrian positions.  It's literally a perfect spot for the French Artillery to bombard.  He weights his left with the bulk of his infantry, and pushes a Brigade forward to occupy Baumersdorf, which the Austrians have recently evacuated.  

A gorgeous firing position!

The Shako scenario stipulates that the French must have "a unit" on the heights by 1240 hours.  In this instance, we kept the original 15 turn limit and said the French must have a brigade on the upper heights of the field.

The Austrians arrayed along the hills awaiting the French onslaught.  The Austrian gunners are about to open fire on the French who will advance into their shot!


A Brigade of Pendraken French painted by Jack

Almost reached the town!

I love this picture!  French approaching the Russbach while the Austrians look on


Austrian Grenzers fire at the French along the Russbach!

Shelling Baumersdorf!  Note the Austrians on the other side of the Bridge to oppose the crossing

It takes Alex about 3 turns to get into position to launch an assault against the heights from Baumersdorf.  His troops form into assault columns in the shattered village and charge the bridge!

French preparing to assault the heights!
 
A hardcore French volley Disorders the Grenzers (yellow hit die) who will have to fall back

Note the yellow die on the left-  that's the Grenzers who were forced back by ranged fire.  The French going into turn 5 are in excellent position to launch the assault.

Here they come!  French cross the Russbach in force - voltiguers on the right of picture

As in the actual battle, the French storm the heights but vicious Austrian counterattacks make life tough for them to stay.  A French brigade charges with elan across the bridge and secures a toe-hold on the heights!  They're promptly sent back by the elite Grenadiers of the infantry reserve.

Alex moving his infantry up to assault the hill!

French toe hold on the lower heights


A breakthrough on turn 5!
Turn 6 sees the Austrian grenadier counterattack which eliminates the French breakthrough.  The Grenadiers, supposedly the infantry center reserve, are now holding the line.

Grenadiers counterattacking into the French Breakthrough!

Situation turn 6.  Grenadiers hold the heights and the French were pushed back in heavy fighting.


General Brady moves to straighten out the line - but will he have the orders?  And will the French let him?

Alex has a battery go "out of ammo" by rolling a "1" on their ammo die.  They'll need to spend an order to resupply the guns but Alex is also short on orders now, as units within 1 BW of an enemy require 2 x orders to carry out an action!

left French battery go silent.


Alex's feint in the center has worked so far and his infantry begin to roll up the Austrian right.  Meanwhile, Alex throws in his reserve Dragoons at the Grenadiers, who are ordered.  That means they can use their order die to fire before the melee, or they can use it as an extra combat die in the fighting.  They shoot - and to great effect, scoring 3 disordering hits!  The Dragoons are now -1 die for the rest of the game.

High drama and excitement as the French Dragoons crash into the Austrian Grenadiers!

Warm work in the center as the French also charge the Austrian battery on the heights.  They'd be successful in the combat ( in Eagles, guns always lose melee regardless of hits) but would break themselves carrying the position.  


The ordered Austrian guns fire a deadly volley of grapeshot into the advancing French.  The French win the combat but at a high price!

By turn 8 the battle is shifting to the right of the Austrian positions now as the French try and flank the main hill position.

Alex unleashes a deadly assault against the flank of the Austrians with his infantry reserve, including his elites, denoted by a stand of Carabiniers here and Voltiguers in the foreground.

Baden troops bringing up the rear!

If this doesn't look "napoleonic" I dont know what does.  Infantry gathering to assault the heights!

It's worth mentioning here that we tried out a cool feature Alex has worked into his other rules called the "respite" or a lull in the fighting.  Anytime players tie on an initiative roll, the turn is advanced by 1, and every unit may attempt to rally.  This happened 3 times in this game and while the Austrians didn't make every roll, they rolled critical "6s" where they needed, losing 2 hit points.

Austrian line now oriented towards the right.  Guns were pulled back to the main heights.
by turn 10, it's obvious the Austrians will likely lose.  Alex has fresh brigades to introduce so perhaps the time is right to move the Cavalry up!


Both French batteries go out of ammo now.


Alex assaults the guns and moves his infantry in, securing a lodgement on the greater heights.  A last-minute charge by the Austrian cuirassiers pushes a French Brigade back, but it's too little too late! The French still have a brigade of Dragoons to throw into the fray and my Cuirassier are promptly destroyed! The French hold the heights with a comfortable margin.  Oudinot will receive his Marshall's Baton!

When you return to the Army HQs, tell Charles I really like these rules and must insist upon them for the next battle!

All told this game took about 3 and a half hours to complete - perfect for an evening's game.  I feel as if the battle demonstrated the versatility of the "Eagles" rules with lots of cool features to keep the game interesting like the switching initiatives, batteries running out of ammo, and bonus dice for certain combat advantages.  It was nice to play a grinding, attritional slugfest like Wagram where fancy maneuvers and battlefield trickery give way to courage, valor, and ignoring the sickening feeling in your stomach as the assault goes in under shot and shell!

In Eagles, Maneuver and movement is very loose, allowing for sweeping maneuvers that you would expect on a Napoleonic battlefield.  Shooting keeps the game moving and both Alex and I were musing that the rules would be perfect for a big battle, and with the single based units there is no fiddling with bases or formations.

Also the turn sequence is such that you can pick the order of your actions, bombarding the enemy with artillery and softening him up before going in with your infantry, and then cleaning up with Cavalry.

I am very much looking forward to more games with Eagles, and also taking them into the future.  I hope you enjoyed reading as much as I enjoyed playing the game and writing about it!

Today is Labor Day in the US, and Ken and I were supposed to play Sam Mustafa's "Rommel" but my wife is under the weather and I'm on kid duty.  That gives me more time to prep the forces for next week.  I also am moving forward with the single based Napoleonic units in 10mm - I think they looked incredible on the table and am very pleased with the results.  For now, more AWI painting (1 more unit till DONE!), SYW and Napoleonic 10mm painting, and prep for the Germantown MEGA GAME to be held in December.  I also have some other surprises on the back burner which I've moved to the front burner lately so stay tuned!  Lots of great gaming goodness coming up, including some highlights from the "Simple Wargaming" project.