Friday, February 18, 2022

GDW First-Battle System: Team Yankee 1987

Everyone knows I love to travel down rabbit holes when it comes to wargaming.  Once recent sojourn into the world of retro board wargames turned into a delightful, albeit expensive, trip down memory lane....


Letting the cat out of the bag, I've been working on some "big battle" rules and games using miniatures and based on hexmats with physical terrain that can be used to put some of the biggest Tricorne or Napoleonic battles, Wagram, Eylau, Aspern-Essling, or Prague from the Seven Years War, onto a 6x4 table using scaled up units, small hexes, and simple rules.  The logic being - those games are just really fun.  

I also thought about applying the same treatment to World War II gaming - basically converting a game like Rapid Fire Reloaded, or Command Decision, to hexes.  That might be a lot of work - or would it?  What would it take to convert a minis game to hexes?  What about an existing hex game to minis?  We've been down this road before...


Enter the now-defunct GDW's range of games from the "First Battle" series.  The concept behind "First Battle" was simple - produce a series of "quick play" games that had common elements in rules and presentation that could serve as a "First Battle" for someone getting into wargaming, and also had enough advanced features to appeal to seasoned wargamers.  

The final "First Battle" games of the series upgraded unit size to platoons from squads and individual vehicles, and introduced some of the concepts you now see in Command Decision such as command and staff units, and orders transmission  - so the systems seem to be related, sort of.  Perhaps related in that they came from the brilliant mind of Frank Chadwick, but there are similarities.  

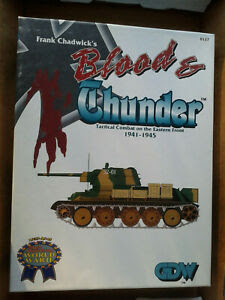
One of the final games of the system, B&T established platoons as the basic unit of maneuver in First Battle instead of individual vehicles and squads/teams

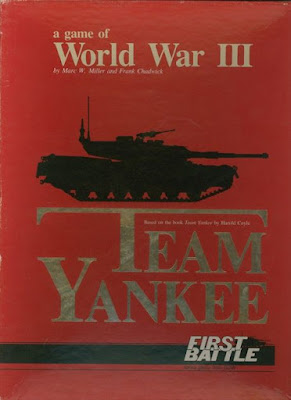
Anyways, this led to a buying binge of GDW games off Ebay, including a my third purchase of GDW's 1987 "Team Yankee" (I had sold or given away my last 2 copies), "Test of Arms", "Sands of War", "Stand & Die" [the First Battle "Flagship" if you ask me], and luckily for my wallet, I already owned "Blood and Thunder" which covers the entire Eastern Front of WWII.  

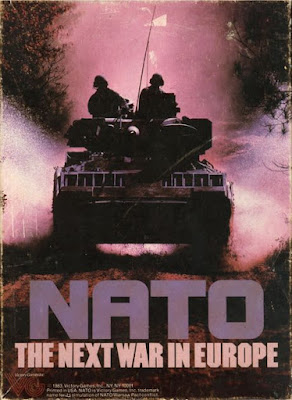
I bought these rules because I had always wanted to own them, ever since the days when I was a snobby, operational level gaming 7th grader, who thumbed his nose at "boring" tactical simulations in favor of huge 10 mile hex maps of Central Europe featured on Victory Games' NATO: The Next War in Europe.  (it would be 2 years until I discovered John Hill's Squad Leader and PanzerBlitz, both life changing events)  

The box art oozes authenticity.  The intensity of a Bradley crew tearing across a river ford near Bad Hersfeld...

Anyways, the GDW games on the shelf in CAPS' COMIC CAVALCADE in Bethlehem, Pennsylvania had all of the GDW titles, and the artwork on the box of Battlefield: Europe made me want to buy them.  All of them!  Alas.  When you're a 7th grader you never had alot of money at any given time so I took what I could get.  In a choice between the 30 dollar "NATO" or the 30 dollar "Battlefield Europe", I chose NATO.  That's been remedied now to the chagrin of my wife but at least the titles are on the shelf.  This did set back my huge Russian 10mm Eylau purchase but there is next month!

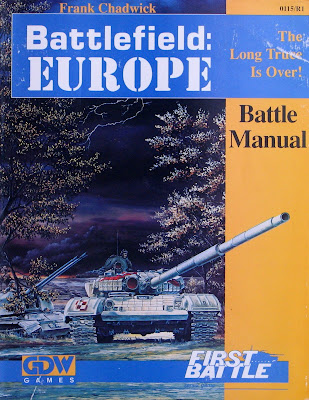
Still one of my favorite box art pieces to this day - and I dont even own it!

Fast forward to 2022.  I'm a time-strapped, 40-something family man with a headful of wargame projects and not enough time to accomplish them all.  My plan is to play some of these games out with minis on the hex board to see how it feels but I first wanted to learn the rules again - which is exactly what we're going to get into next!  There are posts out there abound with gamers using PanzerBlitz and PanzerLeader counters but using the First Battle sequence of play and system. Could "First Battle" be my answer to big battles with minis and hexes?   Read on to find out!

Scenario 1: To the Rescue!

It's World War III set in 1985.  Central Europe - West Germany.  An American Cavalry Section in M3 Bradleys with their dismounts are holding a forward village and they're under attack.  Soviet forward elements in T-72s and BMP-1s are bearing down on them, and 2 x M1's are hastily coming to reinforce.  Let's see what happens.

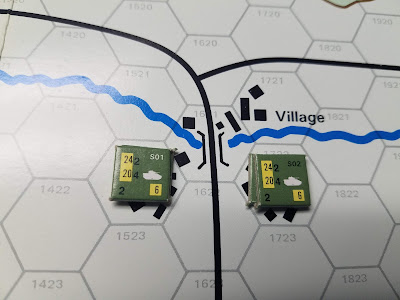
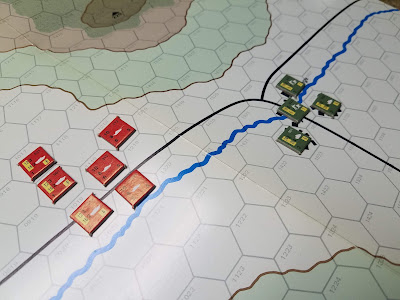
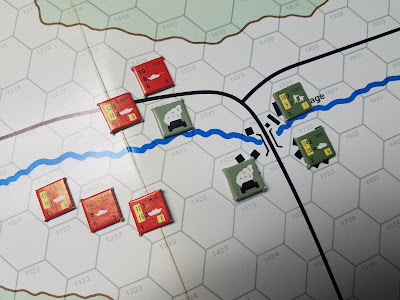
Starting positions.  The Bradleys are deep in the village to avoid being seen.  Their dismounts are mounted, per the scenario.  The Americans set up first.  I opted for protection and deployed conservatively.  PS I love the counter art for the Team Yankee counters.

The Soviets are the "attacker" and have the initiative.  They can select whether they want to move first or second, each turn!  Yes you are correct- they could chose to go second this turn, and first next turn.  Which is precisely what they do!  The Americans must adjust their positions and dismount their dismounts, so they cannot take up a "firing position" which would have enabled them to fire during the Soviet move (think of it like overwatch-if you dont move this turn you can fire during the enemy's move).

Turn 1

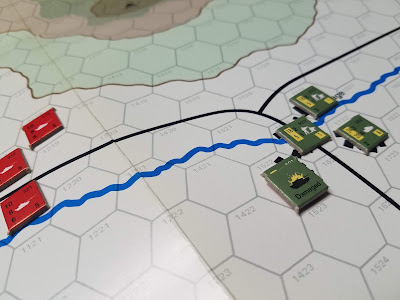
Holding out at the Village.  1 x Bradley is in reserve to the south.  Soviets coming from the north at high speed!  Soviets have the initiative, which is powerful.  The Americans have spread out into the other sections of the village to get more guns and missiles pointed at Ivan.


The Soviets close the distance fast!  They're almost within half-range which is a double-gun attack (a 10 strength becomes 20 on the CRT).  Leading the charge are 3 x T-72s with 3 x BMP-1s close behind.  The Americans are on the backfoot already and cannot react.  And guess who will move first in turn 2?


The "final attack phase" of Turn 1 sees the Soviets fire 2 x T-72s at the Bradley in the western end of the village.  The first shot damages the M3.  


The second shot from the next T-72 destroys it.  The American platoon commander is sweating.  The next T-72 declared it was firing at the dismounts in the village.  They score a pin and end a very impressive round of shooting for Ivan.


Turn 2

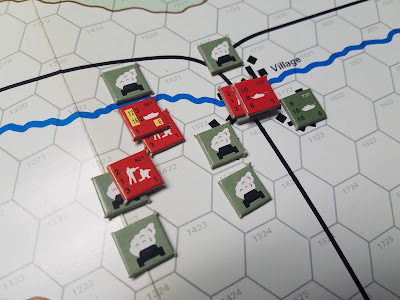
The Soviets move first.  The BMPs ford the small creek and attempt to flank the village.  Instead of keeping any kind of cohesion between platoons, I send a T-72 with one of the BMPs, and a BMP with one of the T-72s.  I'm thinking a few turns ahead and it doesn't look good for the Americans.

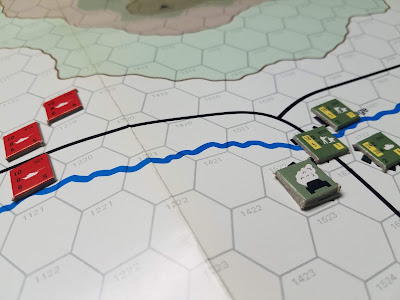
Pinned US troops in the village and a destroyed Bradley burns while the Soviet flanking force crashes south of the ford.

The Americans are out for payback.  They've decided to not give up the village without a fight.  The dragon team on the north bank of the creek in the village readies their launcher and lets a missile fly at a T-72 that is skirting the creek.  It is destroyed instantly from the missile shot and the Soviets know they can't be so careless with their advance.

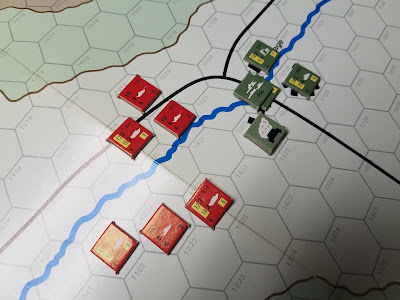
missile shot from the infantry team in the village takes out a T-72 next to the creek.
Then, in perfect Cavalier fashion, the US M1s arrive with "Garry Owen" playing in the background.

The M1s with their 8 hex movement tear up the road from the south and engage the Soviets.  A T-72 is damaged (eventually destroyed), and a BMP-1 is destroyed.

Turn 3 - 5

The Soviets, now with the arrival of 2 M1s on the battlefield, get serious.  They take the first turn and try to turn the tables on the M1s.  An extremely lucky shot from the BMP-1's AT-3 missile destroys one of the M1s.  Soviet dismounts survive from the destruction of their IFV (they roll a 1-3 successfully).  To the north, the Soviet fixing force creeps into the village and mixes it up with the Bradley and remaining US dismounts, finishing them off with a ton of "1"s rolled (rolling low is good in First Battle).  The Soviets have control of the bridge and have a T-72 and an infantry dismount team in the middle of the village.  The remaining US M1 pulls out.  Game is over in 5 turns.  

All due to bad positioning and potentially bad decision making (moving both of the Bradleys on the first turn instead of firing with one bradley while the other one dismounted, essentially the "wingman" bradley covering his battle buddy while it dismounted.  This is all painfully realistic)

"Look at this, Codman.  I love it.  God help me I do love it so."

Analysis

This was a great game.  Lots of fun and hard decision making.  You start to see how you can use the turn sequence to your advantage with the Fire-Move-Final Fire sequence.  The game rewards "softening up" an objective with fire, as well as fire and movement, and covering fire.  The old adage of "if it can be seen, it can be hit, if it can be hit, it can be killed" rings true.

If the Americans would have deployed better, they could have placed their Bradleys in "firing positions" with Overwatch and likely knocked out a vehicle or 2 on the way in.  Something interesting to consider?  Look at all the knocked out vehicle carcasses.  Probably not far from how a WWIII scenario would have played out in such close quarters.  

NATO's edge in this game were the M1s and the reach and lethality of the TOW missiles.  Other than that, a Soviet infantry team is similar to an American one, and a T-72's gun is deadly at close range, doubling itself to a "20".  All sounds pretty logical and the First Battle System racked up an impressive and evocative game.

The Transition to Minis?

How does all this bode for transition to a minis game?  Actually pretty well - with caveats.  The game has been "dead simple" so far, and very fast.  This game played in about 30 minutes with most of that time taken up with me reading the rules.  Overall it has great potential to be played with minis - but is it as simple as just plopping the microarmor down and using tanks instead of counters?  Not so fast!

The use of a combat results table is limiting.  Meaning that with a CRT, it doesn't feel like a miniatures game, it feels like a rendition of PanzerBlitz or PanzerLeader.  For the cousins "Sands of War" or "Blood and Thunder" where a counter/stand = a platoon that is probably more appropriate, but when a counter is a vehicle, I want a "to hit" / "to kill" roll which is greatly abstracted here.  

I'm not knocking the system mind you.  This entire game felt genuine.  The lethality of modern systems is the ultimate lesson.  So the abstraction enables you to put the huge battles from the end of the "Team Yankee" book onto a table and play it in a reasonable amount of time.  That said, if you want to play it with miniatures and you want it to feel a little more like a miniatures game, you might want to consider some things.  So what might those be?

Terrain for starters.  You'll need terrain, smaller terrain to fit into the hexes.  Lichen, clump foliage and trees will be needed to capture the feel of a miniatures game as well.  Same thing with hills.  Team Yankee and the other First Battle games have lots of elevation differences.  Since the caveman days, man has been trying to figure out how to model functional and cool looking hills for hex games on the tabletop.  Something to consider.

Something else to consider is creating a QRS so you're not flipping constantly through the rules.  There aren't many rules, but much text has been put onto about 8 pages of rules and you'll be going back and forth quite a bit.

The initiative seems a bit generous and powerful.  I'd probably introduce a random initiative roll each turn, but I dont see how that would impact playing with minis.  I'd also add in random events and/or a time clock like in Norm's "Tigers at Minsk" which adds a wonderful tension and uncertainty to the entire game.

Finally the Combat Results Table.  While I love the idea that the to-hit and to-kill process is abstracted into a single die roll on a table, and that a counter has all of the self-contained information you could want, with values assigned to armor, gun attack, movement, and gun / missile range, I'd love to take that data and translate it back into a "To Hit" "To Kill" roll.  Mathematically that's possible but I'm not a mathematician and so it will take much time and energy for a dummkopf like me to convert the values of the weapons and armor, along with the probability of hitting and probability of killing vrs damaging AFVs.  That equally applies to pinning vrs killing infantry teams.

Other than these "considerations" the Team Yankee game from the First Battle series is shovel ready. So if you really like the GDW "Team Yankee" board game, it's ready for you to plop your minis down with maybe the counters behind or under them, and play.  If you want it to feel a bit more like a miniatures game while still using the stats, scenarios, and turn sequence, you'll need to do a bit of homework.

This was a very fun and satisfying exercise and I'm looking forward to playing Sands of War with my Western Desert WWII MicroArmor or Desert Storm kit (fancy a fictitious Soviet Airborne assault into Saudi Arabia? - you could do it with the SoW rules). 

If you liked this post, definitely stay tuned because I'm participating in a similar "experiment" tomorrow with Ken using a slightly more modern WWIII board game for potential use as a minis game on hexes.  The experiment continues!  

DUNN-KEMPF

Also a special BONUS feature - my blog has had a commenter named "Mitch" who has been patiently waiting for a number of years for me to complete the Dunn-Kempf project.  Rather than complete a second blog post below this one, I'm linking to the post from a number of years ago where we unveiled our aspirations to play Dunn-Kempf and I'm going to put a game on the table for Mitch.  I completed an entire T-62 tank battalion, BMP-1 company, and supporting arms like artillery and recon, as well as the Americans with the older MTOEs (M60 tanks, M113 APCs) , to play a game of Dunn Kempf from the roaring 70s.  I even painted them in MERDC.  Sadly, I've never gamed with them!  So stay tuned everyone.  Mitch, your wait won't be much longer now!  This is the year!


Saturday, February 12, 2022

Developing a Biazza Ridge Scenario for "Battlegroup" - Scenario Coordinating Instructions

 Hot on the heels of our last Biazza Ridge OOB post, I'm following up with probably my favorite of the whole lot - the scenario coordinating instructions.  This is the post where we impart some of the scenario-specific mechanics onto the game that ensure that the commanders participating get some of the feel for the battle out of their game.  This is also the post where we set the victory conditions, reinforcement schedule, and the parameters for victory.  Luckily we know how this all ended in real life, which always makes it a bit easier.  Besides publishing the map, this is where the meat of the scenario is put onto the bones.

Following the format we used in the Hubbardton Scenario Coordinating Instructions post, we'll discuss the parameters of turn length (or lack thereof!), victory conditions, reinforcements, and starting positions, all within the confines of the pre-selected Battlegroup templated scenario.  We'll also discuss what happened in real life, so we have an idea of what to match our experience against.  Let's get into it!

Turn Length & Reinforcements

Battlegroup doesn't have turn lengths for games.  Instead, it uses a morale-clock type function called "Battle Rating" whereby the force's overall morale is randomly chipped away through chit pulls.  So time isn't quite as significant for our purposes since time seems pretty elastic in the games, given the random number of actions allowed per turn (D6 rolls + officers = actions allowed).  I love this feature because it ensures no 2 games are alike and has a smattering of random things that occur as a result of the chit pull.

The Biazza Ridge fight started mid-day and lasted through to the early evening.  It seems that reinforcements for the Americans trickled in, including elements of 3rd Battalion, 505th PIR, elements of C Battery, 456th Artillery (Airborne), and eventually 45th Division troops and some tanks, as well as a Naval Gunfire Liaison team, likely from Navy Beach Battalion #4 (thank you Dave!).

To me, since time is not a factor for games of Battlegroup, the appropriate feel is what we're after.  COL Gavin will start on the table (Forward HQs, 505th PIR), along with the engineers who were accompanying him, as well as a single squad (2 "units" in Battlegroup speak, an MMG team, and an Airborne Rifle Squad).  The remaining infantry will start to join the fight on turn 2, but this will be randomized.  So elements will feed into the battle just as happened historically - in dribs and drabs. 

For the Germans it will be the same thing.  To give the game some tension, the German Armor, and the American artillery (both the howitzers and the naval support team), will be the last units to enter the table on their respective sides.  The Germans are starting with a platoon of Panzer Grenadiers without heavy weapons or a Forward Observer on the table.  The Germans also do not have any officers starting on the table.  The Germans will have to bring their officers on, forcing them to choose between the opportunity for extra orders or extra units and combat power.    This will nicely reflect the command challenges faced by the Germans on the day of the battle, and the typical paratrooper feeling on the American side that you probably never have enough of what you need on any given day!

The German armor will come on last, and depending on the D6 rolls, the Americans should have the opportunity to get their squads into position (but maybe not, if the German player rolls consecutive 5's or 6's to get reinforcements on the table!).  So, our timing here will be set by our reinforcement schedules, and forcing the artillery and German armor to show up last, basically making this about the initial contact on the ridge and eventual American capture of the ridge.

Victory Conditions

The Victory Conditions for the game are as per the Battlegroup "Attack / Counterattack" scenario, so the first player to reach their morale breakpoint will instantly lose.  COL Gavin's leadership undoubtedly helped keep the Americans on the ridge so he imparts a +1D6 to the morale level at the start of the scenario, in addition to what the morale level is for the Americans.  

On paper, the Germans start with a higher morale breakpoint than the Americans (32 to 29) but with COL Gavin's 1D6 roll, the Americans could be up to 35 if they roll a 6 at the beginning of the scenario.

COL Gavin (right) a +1D6 kind of officer!

 Starting Positions

The Americans will start on the east side of ridge with the Germans starting on the west side.  Both players will pick an objective per the Battlegroup rules, but 1 objective will be placed in the direct middle of the table, ensuring the ridge is fought over by both players.  (the enemy player must pull a chit when the opposing player seizes an objective).  Here are some great historical accounts of the events leading up to the battle that will help establish the starting positions:

Gavin took a platoon of 307th combat engineers and headed west on the highway leading from Vittoria to Gela. Soon he heard gun fire and continued down the road. At this time it was about 8:30am. He reached a point where a railway crossed the road and saw Biazza Ridge in front of him about half a mile away and 100 feet high with a gradual slope to the east. The firing he had heard earlier was coming from the ridge and its intensity was increasing. The firing was from Germans of the Hermann Goring Division and the 180th US Infantry. They had engaged each other on the west side of the ridge south of the highway. The Germans were occupying the ridge. Gavin deployed his platoon of engineers ordering them to take the ridge. He then sent for 3rd battalion and they came. Source: Breurer, W., “Drop Zone Sicily: Allied Airborne Strike, July 1943”, 1983, page 13

US Paratroopers taking Biazza Ridge

As the battle unfolds there is action with both Companies G and H with a see-saw action over the ridge:

The [Airborne] troopers pushed the Germans over the top and down the western slope of the ridge. Fire intensified with mortars, artillery and machine guns. The Germans swiftly counterattacked, and the troopers were forced back over the ridge’s crest. At that point Company H took over the attack from Company G. They were ordered to fix bayonets and then charged over the ridge engaging the Germans in bloody hand to hand combat, killing many of them and forcing a German retreat. Sometime at this point the men on the ridge first heard the German tanks. The troopers on the ridge chased the Germans down the western side. The Germans counterattacked again, using tanks in addition to the infantry. The tanks were Mark VI Tiger tanks each equipped with an 88mm cannon. There were 17 of them. The tanks began firing at individual troopers with their 88mm cannons. Source: “All American All the Way” Nordyke, P., 2005, page 74 - 75

As we discussed in the OOB post, there were not 17 Tigers at Biazza Ridge.  We know this because at least 3 of them were broken down trying to extricate one of the behemoths after it got stuck during the drive to the battlefield.  For my purposes, a ratio of troops to tanks fits the bill here, and I'm including 2 Tigers and a Panzer III to counterattack the American advance.  This nicely represents a section of the line, and should recreate the desperation felt by the Americans to try and hold onto their positions.

Fighting on Biazza Ridge

So this, I believe, provides some historical context and justification for starting the battle with Gavin on the table, along with an Engineer squad, and an infantry squad.  Nordyke's "All American All the Way" quote above references an intense skirmish between German infantry from the HG Division who had engaged the 180th US Infantry further to the west.  

Starting with a platoon of Panzer Grenadiers, without transport, officers or heavy weapons, and a smaller, "Veteran" band of paratroopers will give ample opportunity for the punch-counter punch described above.  The Americans - with a dash of luck - should be able to seize the ridge and possibly right as the Tigers show up on the scene.  The Germans will have the means to push back in terms of manpower, but without heavy weapons, fire support, or officers, will have a hard time consolidating if they do manage to push onto the ridge.

With all of this information, I think we have enough information to establish the parameters for the Battlegroup scenario.  This will go into the "product" we are producing.  Here we go - another excerpt from the scenario "product" I'm working on:


So next up I have to develop the map for the scenario and by then we will have a complete picture for our scenario and I can focus on painting the miniatures for the game!  The good news is I have ample figures for this battle including battlefront Germans and American paratroopers from the Open Fire box which paint up really quickly.  The only minis I'll have to purchase will be the "Pack Howitzers" from C/456 PFAB.  (PFAB: Parachute Field Artillery Battalion).  Stay tuned!


Thursday, February 10, 2022

Developing a Biazza Ridge Scenario for "Battlegroup" - The Order of Battle

Despite being in the 21st Century with a previously unimaginable wealth of info at our disposal and instantaneous connection to thousands of well-read people, you'd be surprised at how incomplete a picture can still be of a historical battle - even a relatively modern one like this.  

During our work on the Hubbardton Scenario for Live Free or Die, we discussed sources and noted at how single sources by themselves don't always give us a clear picture or even conflicted with other accounts.  

During my travails across the internet and through books, I have been navigating a labyrinthine maze of historical accounts, anecdotal accounts, and others to get a clear and concise picture of the fighting units below Brigade / Battalion or Kampfgruppe fighting at Biazza Ridge.  While I'm sure there are good reasons for that - most historical accounts wouldn't require that level of information - but for the wargamer this clearly won't do!  So what do we know for certain?

What Do We Know?

We know that elements of the 3rd Battalion (Companies G, H, and I) / 505th Parachute Infantry Regiment fought at Biazza Ridge.  We know they were supported by the Regimental cannon company with 75mm "pack howitzers" as well as administrative elements and according to Osprey they were reinforced by "leg" infantry and anti tank guns eventually, along with a shed-load of naval gunfire.  We know Gavin was present throughout the battle, and to the dismay of his officers and staff, he made the epic and monumental decision to stay put.  


For the Germans, our picture of what happened and who, specifically, were where, is a bit more mysterious.  This is where the budding scenario designer starts running into problems.  I'll start with what we know.  We know that the 505th faced Tiger tanks attempting to over run their position, and that there was repeated skirmishing with isolated bands of paratroopers as the Herman Goring Division elements were moving south to the battlefield.  

We know that the I and II Panzer Battalions of the HG Division started engaging other American forces on their way south from Niscemi, and that the Panzer Grenadier Kampfgruppe (unknown strength and composition) pushed back the US 180th Infantry Regiment around the Ponto Dirillo area, near Biazza Ridge.

We know the Tigers belonged to the 2 Company, 504th Heavy Panzer Battalion and that they had 17 of them when their transit to the jumping off point began.  These Tigers might have been chopped from 15th Panzer Grenadier Division to make up for staffing and equipment shortfalls among the HG Division who were combat ready- but not at their paper strength yet.


We also know that many of the 504th's Tigers experienced mechanical problems, or issues with Allied planes in transit to the assembly area. (Remember this is a year before Normandy!  One shocking account had the Tiger crews dismount to wave at Allied aircraft, mistakenly identifying them as FW-190s).  3 Tigers were rendered combat ineffective simply trying to rescue a single one when it got stuck.  Such was the battlefield friction that plagued the HG Division's march to counter attack the beaches around Gela.
504th Schwere Panzer Abteilung


The HG Division attacked along multiple axes towards Gela and found itself fighting in multiple locations.  Biazza Ridge being one of those locations it fought at.  It's noteworthy here, also, that fighting at Biazza Ridge was not part of the plan.  Meaning the Germans did not intend to fight there. 


The trouble I'm running into really is that it's difficult to ascertain what infantry units were present at Biazza Ridge.  I had to turn to Osprey for a more complete picture.

According to Osprey, the fighting at Biazza Ridge involved the 2nd Company of the 504th Heavy Panzer Battalion (Tigers) and Panzer Grenadiers of the HG Panzer Grenadier Regiment, mounted in trucks as their half tracks were near Catania.

This is a bit more complete, but I'm still unsure of what battalion or companies fought at Biazza Ridge as part of the Panzer Grenadier Kampfgruppe.  I'm wondering if that's why specific Battalion designations are left out in some games I've been researching.  We may have to do the same but luckily with Battlegroup, we're only after a slice of the action.  A feel for what happened and the desperate defense of the ridge by the American paratroopers will do nicely for my purposes.

The Battlegroup Forces

So with that said, I "purchased" an American Airborne Infantry Platoon from the "Battlegroup: Overlord" book, as well as a German Panzer Grenadier platoon from the same book.  Our action will be built around those core forces.  Many of the goodies that accompanied Gavin's force are in there, such as the pack howitzer sections from the 505th Regimental Cannon Company, as well as the Shore Fire Control Party.  Additionally, a platoon from the 2-504th Schwere Panzer Abeteilung are included, plus a single Panzer IIIM just simply because I think they're cool.  (Panzer III's were at the primary thrust towards Gela, and were not present at Biazza Ridge.  If this is too "science fiction-y" for you, simply omit the Panzer III.)

So here they are in all their glory - the forces for the upcoming Biazza Ridge game, and a sneak preview of the scenario "product" I'll be developing for Biazza Ridge.  For those who own the Battlegroup Rules, the format should look familiar.  

German OOB for the Biazza Ridge Fight


American Forces

The keen eyed among you will notice that there are restrictions as to when certain units can be brought on the table.  There is a reason for that but I wont give it away until "Scenario Coordinating Instructions" coming up in the next post!  Stay tuned!

Sneak Preview...


Saturday, February 5, 2022

Developing a Biazza Ridge Scenario for "Battlegroup" - The Resources

I'm at it again.  I had so much fun developing the Hubbardton, 1777 scenario for "Live Free or Die" that I'm taking on a bigger, badder, and meaner scenario.  This time we're dipping our toes into the warm waters of the Mediterranean during Operation "Husky," the invasion of Sicily in 1943.  

Husky Invasion Plan

Husky was the opportunity for the western Allies to learn that when things go wrong in an Airborne operation, they usually go very wrong.  That's not to say it was all bad, though.  The tough, exceptionally well-trained British and American Airborne forces fought against long odds amidst some of the most difficult circumstances and prevailed.

For my purposes, I want a hard-fought, gritty battle that showcases the fighting in Sicily.  To me that says steep hills, arid plains, paratroopers, and the Hermann Goering Panzer Division.  The Battle of Biazza Ridge gives me all of those elements.

505th PIR Attacks!

At Biazza Ridge, the American 82nd Airborne Division's 505th Parachute Infantry Regiment (PIR) attacked into the shoulder of the Hermann Goering Division's advance against Gela and the landing beaches.  This was a difficult and bitter action with the American Airborne eventually prevailing.  

82nd Airborne Patch "All American"

Divisional symbol of the Fallschirm-Panzer Division 1 Hermann Göring

Here was a battle where troop quality, leadership, and cohesion meant more than weapons as the HG Division brought Panzers, to include Tiger tanks, to bear against the Americans.  I'd like to showcase the excitement and tension of the battle on the tabletop, as well as the importance of their leaders.  To me that says this battle needs a gritty, tactical set of rules.  

This battle is screaming for the Battlegroup treatment.  But since there are no Sicily supplements for Battlegroup, we'll have to "improvise, adapt, and overcome" as the Airborne say.  So expect this battle to get the same treatment we gave to Hubbardton, with a post on the OOB, the terrain, and perhaps some other scenario design aspects!


So with all that said, here are some of the resources I'll be using for my research into the Battle of Biazza Ridge:

The Resources:

  • Sicily & The Surrender of Italy. CMH Publication 6-2-1.  If you dont have this publication by the US Army's Center for Military History, I urge you to download it and read it.  These compositions are some of the best resources a wargamer can have.  They are written extremely smoothly and seamlessly weave in the tactical, operational, and strategic levels of planning with plenty of juicy detail on the operation and also the lessons learned by the Armies involved.  CMH Pub 6-2-1 is one of those timeless classics you should have!
  • The US Airborne & Special Operations Museum page on the Husky Operations including Biazza Ridge with some cool pictures.  
  • An excellent account of how the Biazza Ridge battle unfolded along with some great personal accounts of the 505th PIR before and during the jump into Sicily along with subsequent combat operations, which will come in handy when we are developing the scenario and characteristics to add flavor to it.
  • Excellent Battle Account of Biazza Ridge, including terrain, pictures and a rare pic of Colonel Gavin around the time of the battle.
  • Another Battle Account of Biazza Ridge.
  • A Breakthrough Assault piece on the HG Division.
  • Wikipedia page on the Hermann Goering Panzer Division


Now time to crawl up into our attic and grab my US Paratroopers and start painting!