Sunday, March 29, 2020

Tigers at Minsk: "Hill 109" with Counters!

"Apologies for my enforced absence" of late, but COVID-19 response has literally consumed my life for the last 2 straight weeks.  Today has been the first day I've been able to sit in the gaming bunker and contemplate everything. I worked from home today, but forced myself to walk away from it all for awhile in the late afternoon.

Once the kiddos were put to bed, I sat down to play a game of Norm's "Tigers at Minsk" but since I have neither the energy nor the time to set up the hex-mat and miniatures, I played with a PanzerBlitz map and counters.  Pretty cool with a "retro" feel and no trouble at all to set up or put away.

Hill 109 and 135
I used the same forces from Norm's "Tigers at Minsk" scenario #4 from the rulebook.  The scenario parameters were roughly the same - capture the crossroads and the highground.  In this case, I allowed the Soviets the option to capture either hill 109 or 135 as long as they also captured the high ground.  The force composition is exactly the same as scenario 4.  Can the Germans hold?

12.00 Hours
Soviets attack in 2 columns, with the armored column of T-34s taking the covered road towards Hill 135 and the infantry column supported by an SU-152 and SU76 along with the Forward Observer taking the hilly, marshy ground to the east towards Hill 109.  All are in command except the forward observer who had better things to do...  Soviet tanks pour through the small valleys in between the balkas.

Soviet armor force on the left, infantry heavy force on the right. 
First blood scored as a German Panzer IV knocks out a T-34/76.  I turned over units who OP-Fired.  

The Germans score a hit against a T-34 but that doesnt stop Ivan from coming!  note the Pak40 covering the woods near the junction.  There is also an HMG on the hill overlooking the junction.  A tough nut to crack!  Germans move the Tigers closer up from their counter-attack position.  They also remove the OPFIRE marker from the Panzer IV on Hill 109.  Das ist alles for German Turn 1.

 12.10 Hours
Soviet engines roar and the Germans can hear the sprockets and grinding transmissions of the T-34s as they race down the road.  The Pak40 has a fleeting target, shoots and misses!  Ivan keeps coming.  All except the FO are in command.  During the German turn, the Panzer IV on Hill 109 KO's the second T-34 in the valley and they die within sight of each other.


 12.16 Hours. 
 Doubles.  HQs suppressed!  Both roll an 8 and both HQs are suppressed.  Or relocating?  Either way, every unit must roll for command check this turn.


Pak40 earns a kill as it brews a T-34 on the road.  Note the reader will forgive the Quad Flak vierling counter - which i substituted for an HMG stand on Hill 135
 12.27 Hours
Soviets keep coming.  FO out of command again...  right column is slow to step off.  The left column infantry get into the war, move off the road and deploy to advance against the German squad anchoring the left of Hill 135.

Germans fire OPFIRE at the Soviets and miss.  Soviet squads beginning to mass to assault the Germans on the German left.

Units cocked within their hex facing left (west) are out of command for the turn.
 The Soviets quickly realize they're going to have to do something about that AT gun at the crossroads.

Soviet platoon on the German right fans out to assault hill 109 - their boots are soggy from the swamp!
 12.39 Hours Doubles.
Both sides roll air strike.  The German stukas hit a T-34 on the road and roll a 6, taking it out.  The Soviets target a Tiger on the road with no effect.  The Soviets push past their stricken comrade tanks on the road and charge at the Pak40 position, MGs blazing.  The T-34/85 is a fierce opponent and they take out the Pak40!


Multiple hits against the Pak40

Are Soviet fortunes turning?
12.49 Hours
The Soviets go for broke against Hill 135.  Their infantry break from cover to assault the Tiger after taking out a German squad.  Flush with success after destroying the Pak40 with a lucky hit, they go for broke.  The Squad breaking from cover is mowed down by the Tigers waiting on the roadway.  Meanwhile things on the Soviet left/German right facing Hill 109 aren't so good, either as the Germans pin more Soviet infantry.  Should have used smoke, Ivan!  Germans fire at the SU-76 and miss.


12.54 Hours
Soviet attempts to unpin are unsuccessful and Germans are having command problems of their own.

13.02 Hours
The Soviets sense one final opportunity to seize Hill 135 on the left and as their infantry broke from cover, taking the Tigers' attention, the T-34/85s break from the treeline in the covered road to assault the hill.  They didn't realize the Panzer IV on Hill 109 had a bee-line to them on their exit.  Even with the -1 for turret rotating, the Panzer IV rolls a "1" and knocks out another T-34.


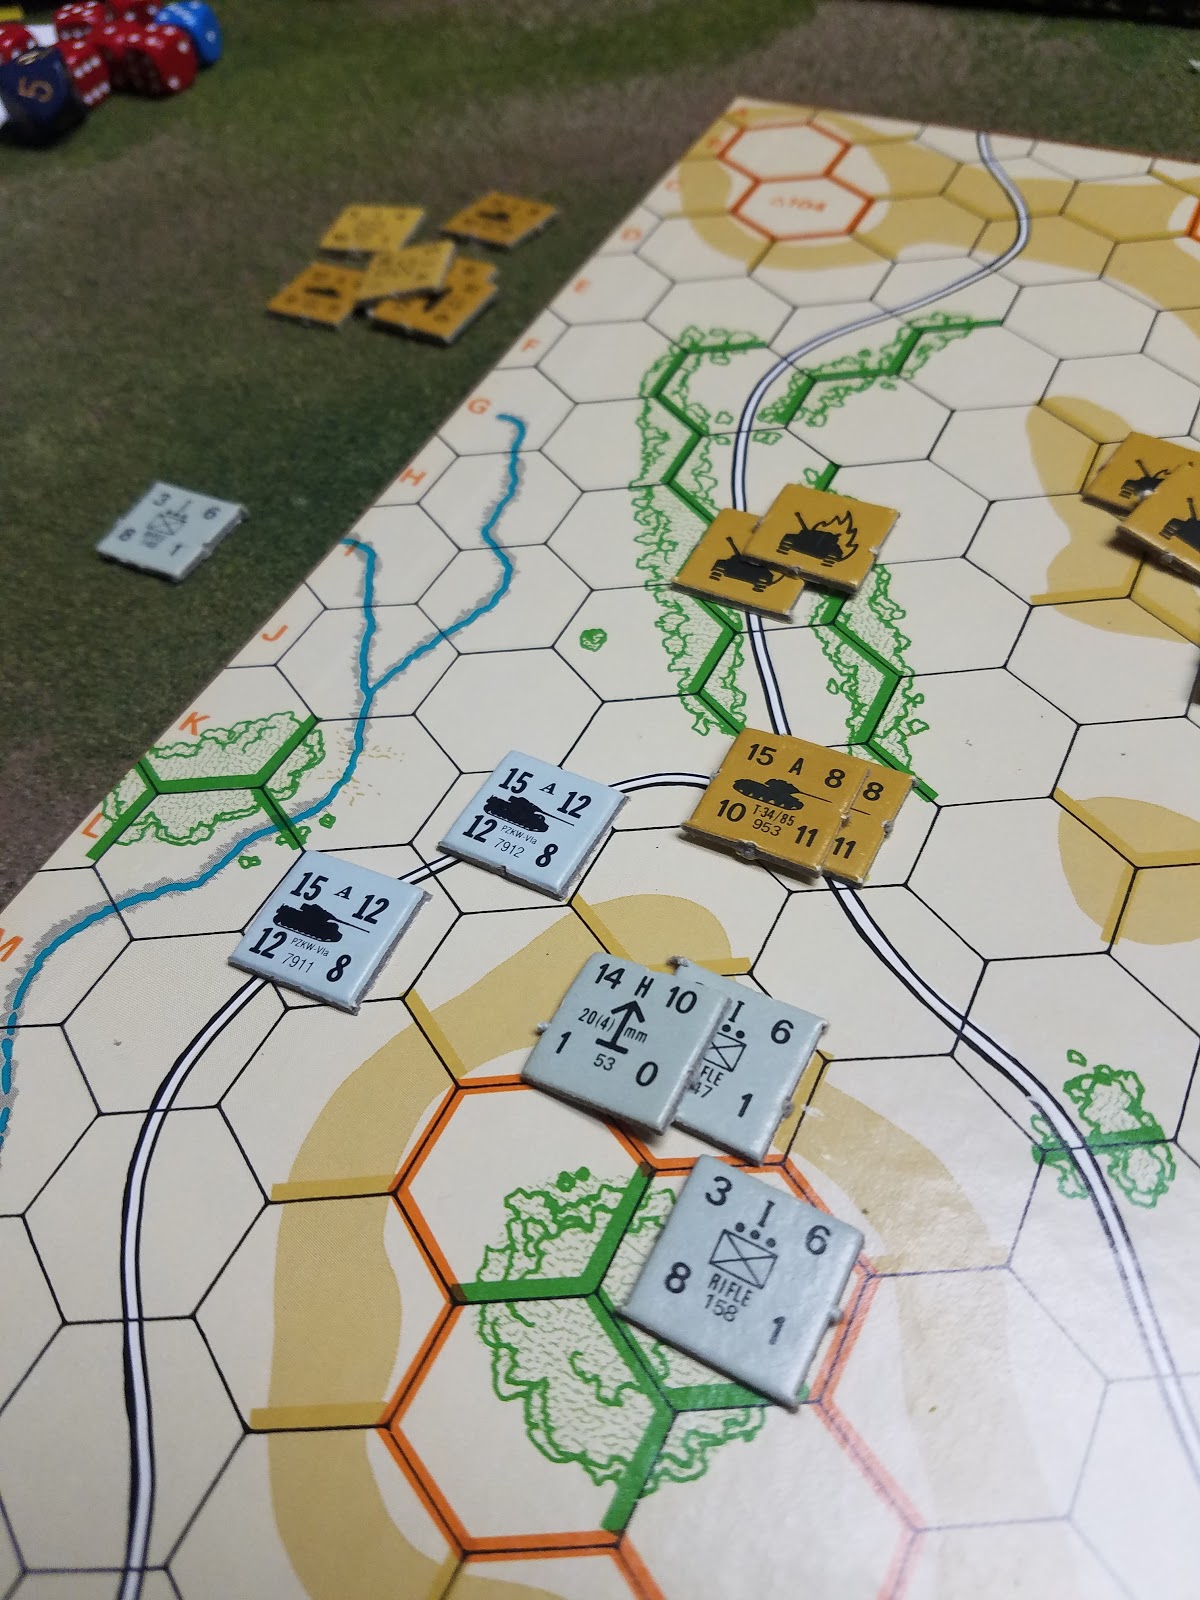
The Soviets also have some heavy firepower on their left in the form of an SU76 and an SU152.  If they can rally the infantry, they definitely have a shot at the hill, provided the turn roll is kind to them.

13.07 Hours
The Turn roll was definitely kind to them!  Can they rally the infantry in time?  The answer is no...  The armor also fails to hit anything and that pretty much sums up the career, and probably life, of the poor Kapitanets commanding this force!

Note the FO still out of command.  X's are pinned units.


Lessons Learned
Well the Soviets didn't really have a cohesive plan.  By the time I realized there could have been mutual support between the columns, the battle was over.  But this goes to show the versatility of Norm's rules.  I literally took an OOB from Scenario 4, and selected a map that I thought looked similar to it and fired away.

The Soviets should have made smoke (allowed to start with 3 smoke hexes) and also should have had a fire support plan instead of starting with the FO on the back line!  (not that it would have mattered - the FO failed his command roll 2 out of 3 times).

The Soviets should have used tank riders and concentrated their force against a single hill.  I'd like to try this battle again.

I hope you enjoyed this small battle!  It was fun dusting off Norm's Tigers at Minsk rules.  Though I still like playing with miniatures better, this was a great way to blow off steam from what's been a very stressful couple of weeks.  No painting, no gaming (since Cold Wars) and nothing but endless, crazy work in sight.  I'm envious of all of you in quarantine right now - I'd have a ton painted by this point but duty literally calls.

Also I'm trying to keep my spirits up by reading all of the great blogs out there, and I felt a little gaming and posting on the blog might do just that.  I hope all of you have a safe week and that you're avoiding gatherings of people, staying healthy, and getting some painting done.

Saturday, March 14, 2020

The Utility and Usefulness of Toy Soldiers: Yankee Ingenuity!

Recently the louver door on our outside dryer vent had one of the louver slats fall off with one of the ends breaking.  My wife felt we needed to replace the whole thing.  Or did we?

Meet Ivan - the common 15mm Plastic Soldier Company Soviet Soldier in summer uniform- more than just a troop stand decoration!
I immediately set to work with the X-Acto knife, testors model glue, and "locktite" which is a kind of crazy or super glue sold at "big box" DIY stores in the USA.  Ivan is giving up a leg and his base in support of the motherland.  I had to bring in the commissars to maintain order.  Times are tough, these days, comrade.  Be glad it's only a leg we are requiring of you.

no slats here missing - nothing to see here - everything looks in order.  
But upon closer inspection...
What is this?!?!?
I was able to glue, then SUPER glue the single leg into place along with the base.  My wife has run a few loads through the dryer and life, it seems, has returned to normal.


I thought I would post this for you all and your significant others!  Thank goodness I had Ivan and his comrades on hand! 

Thursday, March 12, 2020

Modifications to Neil Thomas' WWII Rules from Wargaming: An Introduction

Some of you were asking about my modifications to the Neil Thomas WWII rules from Wargaming: An Introduction which I hinted at in a recent post.  I played around with these over the weekend and they turned out to be a hit (with me, anyways!)


Long-time readers of my blog know my penchant for both Neil Thomas' WWII rules from Wargaming: An Introduction, and squad-based games where a maneuver unit is a squad.  I've always subscribed to the "2 levels down" command philosophy and I've always wanted my World War II gaming to reflect that philosophy.  I like pushing squads around a la squad leader and it explains why I've always preferred games like Norm's "Tigers at Minsk" where a maneuver unit is a squad and the player takes the role of a company commander.


There are lots of really neat features in the WAI World War II rules (HE and artillery fire being some of my favorites) and I wanted to retain those features without changing too much in the game.

1. SQUAD SIZE
Your squads are 7 to 9 figures in WAI, with casualties being by-figure.  I dont want to do individual "figure counting" but I still want to retain the attritional nature of the combat.  To do this, I used a base of figures as a "squad" and presto, no more figure counting.

Squads are knocked out when they receive 7 unsaved hits.  No more figure removal.  I track hits with a dice behind the squad.  My "squads" are FoW sized troop stands of 4 figures but the number of figures on the base are irrelevant.

2. SHOOTING
In the "actual" WAI rules, figures are armed with different weapons.  I amalgamated all of the weapons into a 3D6 die roll, based off of the stats of the Light Machine Gun, since most squads in WWII have an organic light machine gun, I assume here the strength of the LMG is rolled into the 3D6 die roll.  I use the "to hit" values from the WAI rules just so.

I was thinking about a special rule for German up-gunned squads with 2 x MG42s shooting with 4D6, but otherwise the rules for shooting are the same.  1 Squad - 3 dice for shooting.  Submachine Gun Squads will likely have 4 dice or even 5 dice but an extremely short range.

3. MEASUREMENTS
I converted the WAI measurements to inches.  (no changes, just playing with inches instead of centimeters).  So a movement range of 10cms is now 4 inches.  Straight cm to inches conversion.

4.  MORALE
Morale checks are the first thing you do in your side's turn in the WAI WW2rules.  If a squad took casualties last turn, it takes its morale checks at the begining of its current turn and the results dictate what that squad can do in the current turn.  I simply take the morale check immediately after the saving throws from shooting.  (this makes no difference because the enemy can't do anything during your current turn, anyways.  I'm basically just taking the morale check early and not waiting for the opposing force turn to start.  It's really convenient for solo play but you don't have to play it this way.

A "no effect" is a green die counting the casualties behind the squad.  If the squad receives a no action result in the morale check, i put a red die behind the squad.  This tells me that it can not carry out an action in its turn.  For the rare occasion you get the middle result (rolling an adjusted "3" on the morale check) I use the yellow die (half fire, half move).

5. CREW SERVED WEAPONS
I cant take credit for this one - it was Alex's idea - i co-locate an HMG section with an infantry squad instead of treating it like an independent unit that's practically impossible to kill!  (Saves hits on a 2-6!).  This means when the squad is destroyed, the HMG section is destroyed as well.  It do, however give the squad 1 additional hit due to the HMG crew.  I also allow the squad to fire its 3D6, then an additional 6d6 to represent the HMG.

I am looking forward to playing with vehicles and artillery for my next game.  The first game I played was a platoon vrs a platoon, each with 3 squads.  The game was very satisfying and had a realistic ending with the Germans breaking from cover to assault an American position, only to be cut down in the open by fire.

Those are all i could remember at the moment but if I think of any more I will update the post.  These rules are a ton of fun and give a very satisfying game.  If they're not on your shelf, they definitely should be!  I want to play a larger, historical scenario with them to see how it plays out.  I feel like these rules could handle a big, historical fight and give historical conclusions.

Tuesday, March 10, 2020

March WIP: Prussian 10mm Seven Years War Cavalry!

Man it's been awhile since I posted anything!  That doesn't mean I'm not doing anything, though!  

Here is my WIP for March so far - 4 units of Prussian SYW Cavalry and a battery of artillery made as a single-based unit for games like "Eagles Cheaper than Brain Cells" SYW edition, 1 Hour Wargames, Commands and Colors Tricorne (whenever the SYW version comes out) and a few other games like Honours of War, and maybe even Black Powder tried with single-based unit stands.

Prussian Cuirassiers!  I think he was a bit too generous with the glue and sand - our horses legs are mired!
So far for March I've painted 2 units of Prussian Dragoons (22 total riders and mounts) and 2 units of Prussian Cuirassiers (22 total riders and mounts).  I also painted up a Prussian battery of guns amounting to 8 figures and 2 guns.

Seydlitz would be proud!


Can't have Prussian cavalry without their dragoons, either!  Some of my favorite units of the SYW period!  I know the Prussian cavalry hats are all solid black but I felt like the hats were so small they needed the extra detail with the white "tape" or trim as I call it.  It just makes them stand out that much more!  Not sorry!

2 units of Prussian dragoons!


And finally, Frederick himself said "Artillery lends dignity to what would otherwise be a vulgar brawl" and so here are the Prussian guns:


Such a cool pic!  I love the muddy boots and mud on the wheels of the gun carriage!  These men are only 10mm tall!
This brings my total Prussian units in the 10mm SYW army up to 9!  I only need to paint the Generals and 2 units of Grenadiers or Fusiliers and my first "wave" of Prussians will be done.  The Austrians have 2 x Regiments on the table now and I'm hoping to pick up some German Grenadiers at Cold Wars this weekend.  For the Austrians I need to paint a bunch more units including Cuirassiers, Artillery, and lots more infantry.  Progress is slow, but it's still progress!  Stay tuned!  Here are some gratuitous shots of my Americans and SS fighting now...

I was fiddling around with some different WWII rules and I came up with a wonderful, more abstracted version of the Neil Thomas WWII rules from Wargaming: An Introduction where an entire stand is a squad with an organic LMG.  Most of the other rules from W:AI are unchanged and I really had forgotten what a great game those rules deliver.  You will be seeing more of that on my table soon!

The war is this way, son!


The guys on the other side of the hedgerow...