Tuesday, March 8, 2022

Biazza Ridge with Battlegroup: The First Playtest!

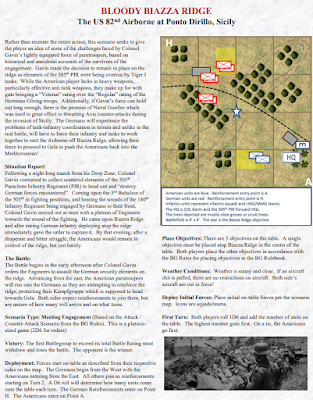
On Sunday afternoon I sat down for a solo playtest of the Biazza Ridge scenario that was posted here recently featuring my newly painted 82nd Airborne troopers and my Hermann Goering Division troops.  The rules used were the Battlegroup series of rules.  

The result was a high-octane shootout with almost no place on the table to hide.  Each side, at murderously close quarters, was able to bring their unique weapons systems to bear against the other. 

view from the American side.  COL Gavin is behind the small house in the lower right while the Germans are in the vicinity of the bombed out church in the upper left.

While this sounds outrageously fun for a tabletop wargame, there were some lessons learned and key take-aways.  Ever wondered how a Tiger tank would fare against a 14 inch naval shell?  How about how a 75mm "Pack" howitzer stands up to an 88mm HE shell fired from a Tiger tank?  If you can answer yes to any of those questions, you're going to love this post...

The game started out as planned, with both sides practically in range of their placed objectives.  The Germans won the initiative and began, almost instantly forcing an American chit-pull for the center and the German side objective.  The HG troopers fanned out onto both ridges while the Americans maneuvered a section into a wheatfield on their side of the ridge.  With only a .30 caliber MMG team, a rifle section, and an elite Engineer squad to counter almost a platoon of HG troops, this would be tough.  The Americans set up a base of fire, and headed for the ridge.

COL Gavin with some of his commo troops at the release point where American reinforcements are arriving.

A US MMG team puts some fire down against the ridge where they can see Germans skulking around

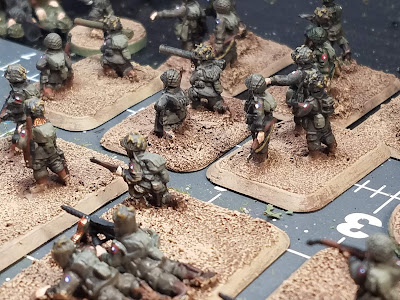
Meanwhile on the other side of the hill, the Germans are getting into position.  Here we see an LMG team and a rifle team from the HG Division getting into place!

The German and American reinforcement rolls begin on turn 2, and both sides begin feeding their arriving reserves into the fight.  Remember, the American artillery and naval gunfire is the last thing to arrive, as is the German armor.  Both sides must bring on all of their infantry reinforcements first, before any of the heavy stuff. 

Germans at the church objective - an EPIC: Armageddon Order Die!

And Germans at the center objective on the ridge, in the olive grove

The Americans open fire with their .30 cal section while a rifle team moves around to their left to counter the Germans on the ridge.  It looks like this will be a fight for the ridgeline for the Americans as the Germans moved first.

Germans taking fire almost immediately from the Americans in the 10-20" range bracket, which is a 4+ to hit!!!  It only gets worse from there.

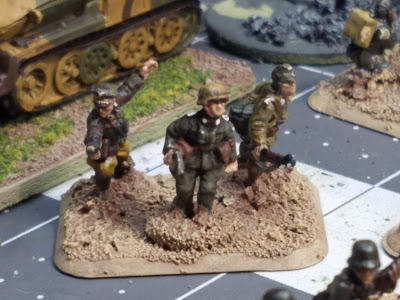
German platoon commander enters the table.

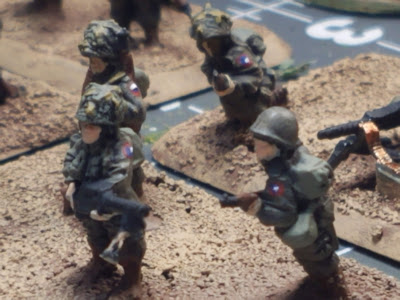
The Americans get the worst of a rough firefight with the HG troopers.  I would eventually pull this 9 man paratrooper section back in order to preserve the force and not pull a chit.

COL Gavin urges the oncoming men from the 3rd Battalion, 505th to take the ridge.  

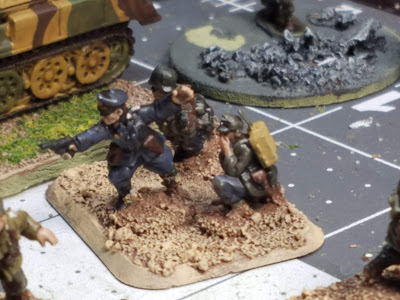
It's worth mentioning here that in the brutal close quarters, the Engineers from the 82nd were sent to the ridge and blunder into close combat with the HG troopers.  They did not use an assault/charge order so it's simply shooting on the 0-5" column which counts every hit except a 1 (brutal)  The Germans will rally and counterattack, but their small 3 man LMG team gets the worst of things and the German team is destroyed in the counterattack.

The American para-engineers are stunned to find Germans on the ridge!  They maneuver and fire at close range.

The Germans are just as stunned to see them and immediately maneuver and counter attack (beyond the call of duty!)  They assault and cause heavy casualties and are themselves destroyed inthe process.

By now all of the US infantry reinforcements are on the table and the Pack Howitzers are coming on.  Gavin's mobile artillery towed by jeeps take up positions next to the initial .30 caliber MMG position and are being used like AT guns from cover.  The teams can hear armor over the cacophony of small arms and LMG fire....

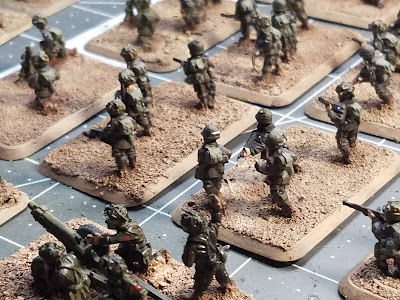
A flood of US reinforcements being sent immediately into the fight.  There is a definite see-saw nature to this fighting.  A side sends up a team or squad, it gets chewed up, destroyed, and the other side sends up another in its place.  

The howitzers show up next

US FO spotting for mortars.  They plop a mortar fire mission directly into the church!  Also note the US .30 cal team behind the copse.  They're watching the eastern hilltop while the US reinforcements move up.

Reinforcements, including the Pack Howitzers are starting to get into position, and German Armor is approaching so it's literally perfect timing.  

Pack Howitzer sections and the Navy forward observers are on site.  Gavin rushes them into position.  Note the dice are what I'm using to track orders.

UNLIMBER!!  Gavin muses it's just like the Civil War - direct fire cannons.

MEDIC!  A US medic rushes into position.  He's greatly needed on the American left where things aren't going so well.  Worth mentioning that he saved a number of "hits" from becoming "hits" on Sunday.

MORTAR FIRE MISSION!  I forgot completely how to adjudicate light mortars - is it direct HE fire?  Is it indirect?  Is it both?  I dont want to ask on the FB forum because I'm not looking to be ridiculed or mocked by that crew.  Anyways I used direct HE fire because you can clearly see the church.  That's their aiming point.  ROE be damned! 

Navy Beach Battalion personnel!  

US MMG team ascending the ridge.

US infantry holding the ridge down.  The Germans are to their front, behind the bend.  They cautiously advance...

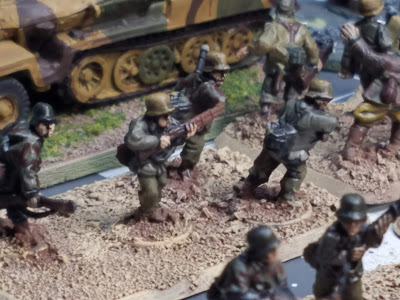
The unmistakable sound of gearboxes and sprockets turning as a Panzer III and a halftrack show up.

Meanwhile the 251/3 command post represents the FWD HQs for the German force, enabling them +1 orders.

The mortars are hammering the Germans in the church.

Germans move out to the ridge as they see more Americans coming up.

Speaking of Americans, a full squad is occupying the ridge now.  You can barely make out reinforcing Germans in the upper left...

The game is at an interesting point now.  Both sides are about halfway to their breakpoint, but are critically short of infantry.  All of the US squads have suffered attrition, and the Forward Observer, Naval Gunfire Team, and Pack Howitzers are getting into position.  The US has a tenuous hold on the ridges but without much strength to back it up.  The Germans have a single squad in reserve attempting to push the US troops off.  The Germans are also setting up a heavy mortar which spells big trouble for the US support troops in the open.  Just then...the Tigers show up!

Tigers rumble down the road, straight towards the Americans.  The Pack Howitzer crews leap into action.  ACTION FRONT!

Advancing alongside the final infantry reserves, the Tigers push forward at top speed.  Their turrets traversing, looking targets but coming up short!

Meanwhile, the HG troopers move out to push the Americans back off the ridge, confident that the arrival of the Tigers will bring victory!

The American Pack howitzers, with absolutely no hope of knocking out the Tigers, fire and one scores a hit!  The resulting morale check pins the tiger, clearly stunning the crew.  The Americans know that now is the time to call in Artillery fire.  The comms check fails, and the re-roll from the comms relay team also fails!  This is bad!  The next German turn brings the turrets laid straight onto the Pack Howitzers.  An HE hit vaporizes 2 x crewmembers but miraculously, the gun is still not pinned.  The Germans zero in with a tripod-mounted MG42 and make short work of the remaining crew, but there is still one remaining howitzer!

The Americans know it's now or never on their turn.  The naval liaison team goes to work.  They amazingly pass their comms check!  The spotting round only deviates 6" and it's FIRE FOR EFFECT.  The 14" shells tear down into the valley, pinning Germans and Americans alike, who are glued into their slit trenches.  One direct hit against the Tiger 1 which is ripped open like a tin can (i laid it on its side like the iconic photo of the action after the Biazza Ridge fight!).  The other Tiger is pinned, as are a host of other American fireteams after the huge shells ripped the hillside apart.  The BP is about even here, 17 American to 18 German, and I call the game as it's a work night and I had to pack up.  

Scenario Thoughts

Well, Battlegroup gave a good game.  Lots of unexpected occurrences and I appreciate that.  With the "small" amount of forces this game was very manageable, even with all of the things you have to manage.  I did run into some issues which I want to cover here, though.  These were more issues with the scenario than the rules.

The Battle Area:  The battle area was too small (4 x 4) for what I was trying to accomplish in it.  Granted, it was a smaller force, but the infantry weapons ranged almost the entire field, and with the "olive groves" being really light vegetation, they didn't hinder line of sight in the game, they just afforded a soft cover save to troops in them.  That meant you could target much of an enemy advancing against you from the comfort of your own baseline, as both the Americans and Germans did with their support weapons.  In many cases, the game turned into a shooting gallery.  There are some remedies I'm thinking of here - namely to enforce a sort of "crest" rule on the ridgeline, and potentially make the olive grove thicker so you cant range inside the entire feature from everywhere on the table.  The main point for this, though, is to expand the play area to 6 x 4.

Objectives: Another by-product of the smaller battle area were the proximity of the enemy to the objectives, which changed hands a few times during the game.  First of all, I've never played a Battlegroup game, or at least played very few, where all of the objectives were secured.  In this game, not only were they all secured, but the ridgeline objective, which seemed to gobble up both German and American units, changed hands at least 3 times.  That was alot of fun, but most likely was a by-product of the smaller table.

Better Defining the Terrain and Restrictions:  I found myself thinking about the olive groves alot during the game, and felt that they should have provided a bit better cover and concealment to the troops within them.  Battlegroup is fairly loose on terrain effects so this is a bit more on me to define in this instance.  Not impossible, but I'll need to put some thought into it.

Infantry Attrition: Due to the super-shooty nature of the game (I attribute this to the confined space of the 4 x 4 table and open lines of sight) the infantry casualties were horrendous and almost disproportionate to the battle rating.  For instance when the game ended we were a bit over half BR for both sides, but both sides had taken heavy casualties with their infantry forces, and there was not a fireteam or MMG team on the table that had not yet been bruised or battered, and we were still a good ways away from the BP of 29 or 32.  I wondered about that as I had not run into that problem with Battlegroup before, and I had played on even more open tables than this (albeit with lots more armor).

Rules Involvement:  I've always liked the BG rules but they can be very involved, especially for someone who hasnt played in awhile.  In this instance, looking up the procedures for various mechanisms was taxing.  Granted, most of my questions were answered (except light mortars) by the rulebook, there was quite a bit of looking things up to make sure I was playing correctly.  Also without someone else, there's twice the work to do when playing.

The bottom line is that this game was a ton of fun with all of the ordnance you could want from bazookas and pack howitzers up to 88mm guns and naval gunfire!  What is not to love there?  That said, I am still wondering how the game would play with different rules sets and am inclined to play with other rules sets to see how the game goes.  Rapid Fire Reloaded comes to mind, as does Flames of War or Norm's "Tigers at Caen" or something similar.  So there is clearly a bunch of work before the scenario is ready for "prime time" to be played at a convention, but it's getting there.

If you play this battle, with any rules set really, I would love to know how it worked out for you!


Sunday, March 6, 2022

A Biazza Ridge Scenario for Battlegroup - Ready for Your Playtesting!

Before I forget or life gets in the way, I wanted to post the final product for the "Biazza Ridge" scenario for Battlegroup.  For those just joining, see the former posts on developing this scenario including the order of battle and scenario considerations.  

Tried to make it look as close to a "Battlegroup" scenario from a rulebook as me and my Powerpoint skills could...

I built the map into the scenario PDF (thank you again to "Jay's Wargaming Madness" for the map template) so be sure to check out the link here or at right!  

BE ADVISED: As of 3/6/22, I have not playtested this scenario but I am looking forward to soon.  If you do play it, be sure to let me know how it went for you?  I plan on playing it next when my gang gets together, and will obviously post!

In the meantime, to get the creativity flowing, be sure to check out some pics of the forces for the game!

US 505th PIR - the vaunted 82nd Airborne - They do not have their flock or foliage added yet.

Hermann Goering Troopers.  I had alot of fun painting the disparate uniform mix of desert/ tropical field gear, and standard field gear.

Other Rules Sets?

This scenario could also be modified to be played with other rules including Rapid Fire, Flames of War, Crossfire, or other popular WWII rules.  I am tempted to play this scenario with the "Flames of War" "Dustup" scenario from the rule book using the US para list from D-Day and the "Iron Cross" books.  And for all of my Brit readers out there, I'm tempted to put a "Primasole Bridge" scenario together next, keeping with the Operation Husky theme of late.

Officer in Luftwaffe uniform with RTO

More US Paras - pay no attention to the screwed up ammo belt behind them....

HG "Forward HQs" 

sneak preview of the 75mm "pack howitzer" from battlefront.

Thanks for looking and if you play, be sure to check in and let us know how it went!  Again, I will playtest as soon as I can get my gang together.

DOWNLOAD THE BIAZZA RIDGE 1943 BATTLEGROUP SCENARIO!

Saturday, March 5, 2022

GDW First Battle System: Miniaturizing The Rules?

In this post, more from the Disgruntled Fusilier Academy of Wargame Sciences.

Photo from "Garandthumb" Youtube site.  Clearly not me.

Continuing on with the theme of late for me, is my experiment with the "First Battle" series of rules, which have turned out to be a very enjoyable and simple system to play with.  In my last post on the subject, I talked about how I was trying to find that "big battle" set of WWII or Modern rules to play on a hex grid.  Looking at games like "Command Decision" it seemed like I could reverse engineer to serve as a satisfying "hybrid" miniatures and board game type system which could handle bigger battles.  

Further research led me back to the "First Battle" series which seem to be a predecessor, at least philosophically, to Command Decision, in a number of ways (and another popular rules set on the market which we'll discuss in a later post!)

More gaming goodness

One of the facets of the First Battle system I wanted to tinker with was to make it feel less like a boardgame (but still, sort of, like a board game....) and able to accept miniatures and feel like a miniatures game.  A caveat was to still use the counter information for the elements on the table.

I took the combat results table (CRT) apart and came up with some probabilities (as Norm calls it - "the maths") for every combat scenario for the limited units available in the 1987 "Team Yankee" game. The result gave me an average of achieving an effect, any effect, on a target.  This became my "To Hit" roll.  To me, I do like a miniatures game that has a "To Hit" and "To Kill" roll for modern and even WWII engagements.  (think of the Squad Leader board game armor engagement system and that's what I am talking about).

In the Team Yankee boardgame, at close range, a target a firing system or team receives an "effect" 66% of the time, requiring a 3+.  At effective range, a target is hit 50% of the time, requiring, you guessed it, 4+.  At long range, a target is hit 34% of the time, requiring a 5+.  I like rolling high and First Battle likes rolling low so I flipped it.  This was pretty easy in determining what was needed and I used the "To Hit" roll as sort of an "entry argument" for rolling on an effects table (this is your "To Kill" roll).

Instead of changing anything from the 1987 "Team Yankee" board game, I simply looked at the probabilities on the CRT for creating a "kill" result at each ratio, then what it would take to achieve a "Damage" or "Pinned" effect.  The result is the exact same probability but expanded to a 2D6 roll.  So now, you can still achieve a "hit" but a "no effect" from your hit and it doesn't feel quite like a CRT.  I do acknowledge that the addition of a "To Hit" roll adds its own trouble to the odds of achieving a kill or a damage/pinned result, but I wanted it in there anyways, if anything to feel more like a minis game.

To do this, you'd still have to compare Gun/Missile performance with the "Defense" score or armor, but it felt a bit more like "Squad Leader" now, and less like a pure board game.  The resulting table looks a bit easier on the eyes than the old CRT we know and love.  Take a look:


So in a nutshell, if the gun-to-armor ratio is a 20 to 10, and I have successfully scored a hit, I would roll 2D6 on the "2:1" column.  If I roll 7 or higher the vehicle is killed.  If I roll a "6" the vehicle is "Damaged".  If the target were infantry, rolling a "5" or a "6" would result in a "Pinned" effect, and rolling "7" or higher on 2D6 would kill.


The "To Hit" roll is easy to calculate - if the target is half of effective range or less in hexes, it's Close (requiring a 3+ to hit).  Effective is a 4+.  Double effective range is a 5+ to hit.  Terrain does not impact the To-Hit roll but I'm glad you asked that question😁

In the basic "Team Yankee" boardgame, woods and town add a +3 to the defense value of the target.  In most cases this resulted in a column shift so that's exactly what we'll do.  Instead of adding/subtracting, terrain enables a single column shift to the left.

How Did it Play?

So this is all well and good, but how did the playtest go?  I put down the old, reliable "To the Rescue!" scenario on the table again and tried it out, but with Soviet forces approaching from the East, rather than the North.

they came on in the same old way....

This time the Soviets are approaching in an abreast line with a platoon of T-72A main battle tanks, and a platoon of mechanized infantry mounted in 3 x BMP-1s.  They're going after the last remaining elements of an Armored Cavalry Regiment's covering force consisting of 2 x M3 Bradley Cavalry Fighting Vehicles and 2 x Infantry teams.  On the way to the rescue are a section of 2 x M1 main battle tanks who will show up on Turn 2.

The big difference in my plan for the US forces is to start with all my troopers dismounted.  This will enable them to occupy "firing positions" (AKA go on overwatch) from the start.  The village is bristling with anti tank guided missiles now!

Turn 1

The Soviets have the initiative, and opt to let the US forces start first.  They wont move and form "Firing Positions" instead.  The Dragon is at long range and the Bradley is comfortable within range.  BOth ATGM shots miss!  

The Soviets come on moving fast.  Since both US elements on the eastern flank of the village have fired, they're automatically spotted.  They engage a Bradley in the town, first with the low velocity gun from the BMP, and then from the 125mm tank gun from the T-72.  The Bradley is hit and then killed.  To the South, the other T-72s focus on suppressing or neutralizing the infantry team who fired at their comrades.

Bradley in the north is toast while the T-72s pour coax and tank gun fire into the village houses, wiping out the fireteam to the south.  Not good!

Turn 2

The BMPs enter the village and take a Dragon right in the kisser as a BMP rounds a corner.

The Soviets with the initiative opt to go first on turn 2, capitalizing on the success of the knocked out bradley, the Soviet officer in charge orders the BMPs to close the distance, fast!  They careen across the open fields bouncing into the furrows and culverts but the distance is closed without a shot being fired from the village.  It's a "close" shot and the dragon needs a 3+.  It hits!  The shot is easily on the 5:1 chart and the BMP is sliced open by the Dragon.  The infantry team inside survives the hit and bails, running into a nearby house.

The Soviets shake off the destruction of their fighting vehicle and the infantry immediately open fire against the US team while the remaining BMP lob 73mm "Grom" shells at the houses the US occupy, resulting in the US forces being pinned.

The Soviet T-72s to the south of the creek hold their position going on "overwatch" since their commander read the scenario and knows there will be M1s approaching from the south...Remarkably, the M1s join the battle and charge in, guns blazing!  they charge up the road and turn off, trying to engage the T-72s.  Not a smart move!  The M1s are knocked out one by one before they have a chance to fire.  Was it a good move to charge them in?  Definitely not.  The M1s easily outrange the T-72 so they should have hung back but this is a playtest, anyways.

Turn 3

The Americans, watching the M1s to the south get knocked out, are on their last legs.  Their attacks against the Soviet forces have been ineffective this turn since the destruction of the BMP on Turn 2 with the dragons.


The Soviets take full advantage of the American paralysis and move in/dismount the remaining Soviet squad.  The pinned American squad will recover this turn, but alas, is knocked out by the remaining Soviet squads to the north and I call the game!

Thoughts

Well that was fun.  The To-Hit roll adds a bit of fun to the system and it doesn't really feel any different.  True there is another layer of rolling, but it's not hard to discern the range to the target and frankly, the uncertainty created by the To Hit roll adds a nice element of tension to the game, which was somewhat predictable beforehand.  An TOW missile from the Bradley is very likely going to kill a BMP, but what if the shot misses?  Anyways this game saw a bunch of disappointing misses from US and Soviets alike.  

Comparing the Gun/Armor values is a bit tedious but it's not too bad.  If you're at close range, you're automatically going to double a gun attack value.  So you know to do that already.  Overall I didn't see anything lacking, or "broken" from playing the game this way, which I fully intend to do more of, but with miniatures.  This game felt much more like a miniatures battle and certainly drew some comparisons to other WWII and Modern games I've played.

My next step is to make a comprehensive QRS that you can play directly off which includes the vehicle and troop values on it.  I also want to play with artillery and morale rules next.  Then integrate airpower.  This should roughly work for the WWII variants as well, which are a bit more nuanced with the terrain rules, but overall are the same.

Similarities to Another Rules Set & Future Posts

As I was dissecting the CRT for Team Yankee 1987, I noticed a big similarity to another game system - Fistful of TOWS 3, at least in terms of the "basic" Sequence of Play, the concept of the "Firing Position" or "Overwatch", and the odds of causing an effect on the target.  FFT3 needs a 4+ To Hit that is affected by range and /or troop quality so that the majority of engagements' To Hit rolls turn out to be a 3+, 4+, or 5+!  

The To-Kill roll is slightly different, but is done via a comparison of Armor to Gun Penetration results.  Instead of a single roll, the resulting difference in Gun to Armor equals the number of D6 you roll to penetrate, with each "6" killing outright, and a 4 or 5 forcing a "quality check".  The math just looks incredibly similar to the First Battle System and I want to explore those similarities in a future post.  FFT3 looks like a great candidate for hex-based, WWII big battle rules, potentially even using the First Battle scenarios from Sands of War, and Blood and Thunder.

And speaking of future posts, Im doing more work on my "Big Battle" Tricorne and Napoleonic rules to hone those and get them ready for primetime.  I've also been re-reading the Black Powder rules, and have been writing down more thoughts on low-level WWII fighting and rules I want to play.  

I plan on posting on those thoughts in the future, and my Biazza Ridge scenario for Battlegroup is almost ready to be posted and play-tested!

For some long-term posts, with current events I've rekindled an interest in post-apocalyptic gaming and have been looking at Twilight 2000 for a potential skirmish campaign.  In other fronts, and need to get my Ancients forces rebased to get them on the table, and have a mind to rebase my 10mm fantasy forces.  Stay tuned!