Following Duc de Gobin's lead over at
"Warfare in the Age of Cynics and Amateurs" I played a very enjoyable game of
"Muskets & Mayhem" on this, my precious only day off for a few days. I have to say, after playing 2 games of these rules, and reviewing the After Action Reports over at Duc de Gobin's blog, these rules are very satisfying and deliver good results in a reasonable amount of time.
 |
| The Union Battle Line. |
By "good" results of course I mean my perception of realistic, with outcomes that are not beyond the scope of possible with a given set of forces. These rules do force you to make crucial decisions regarding placement of artillery, commitment of reserves, lines of fire, and unit status, all things a Division Commander would have had to be kept apprised of during the American Civil War. (another important aside here - Muskets & Mayhem are being written to cover the whole breadth of the Horse & Musket period and not just the ACW or AWI)
 |
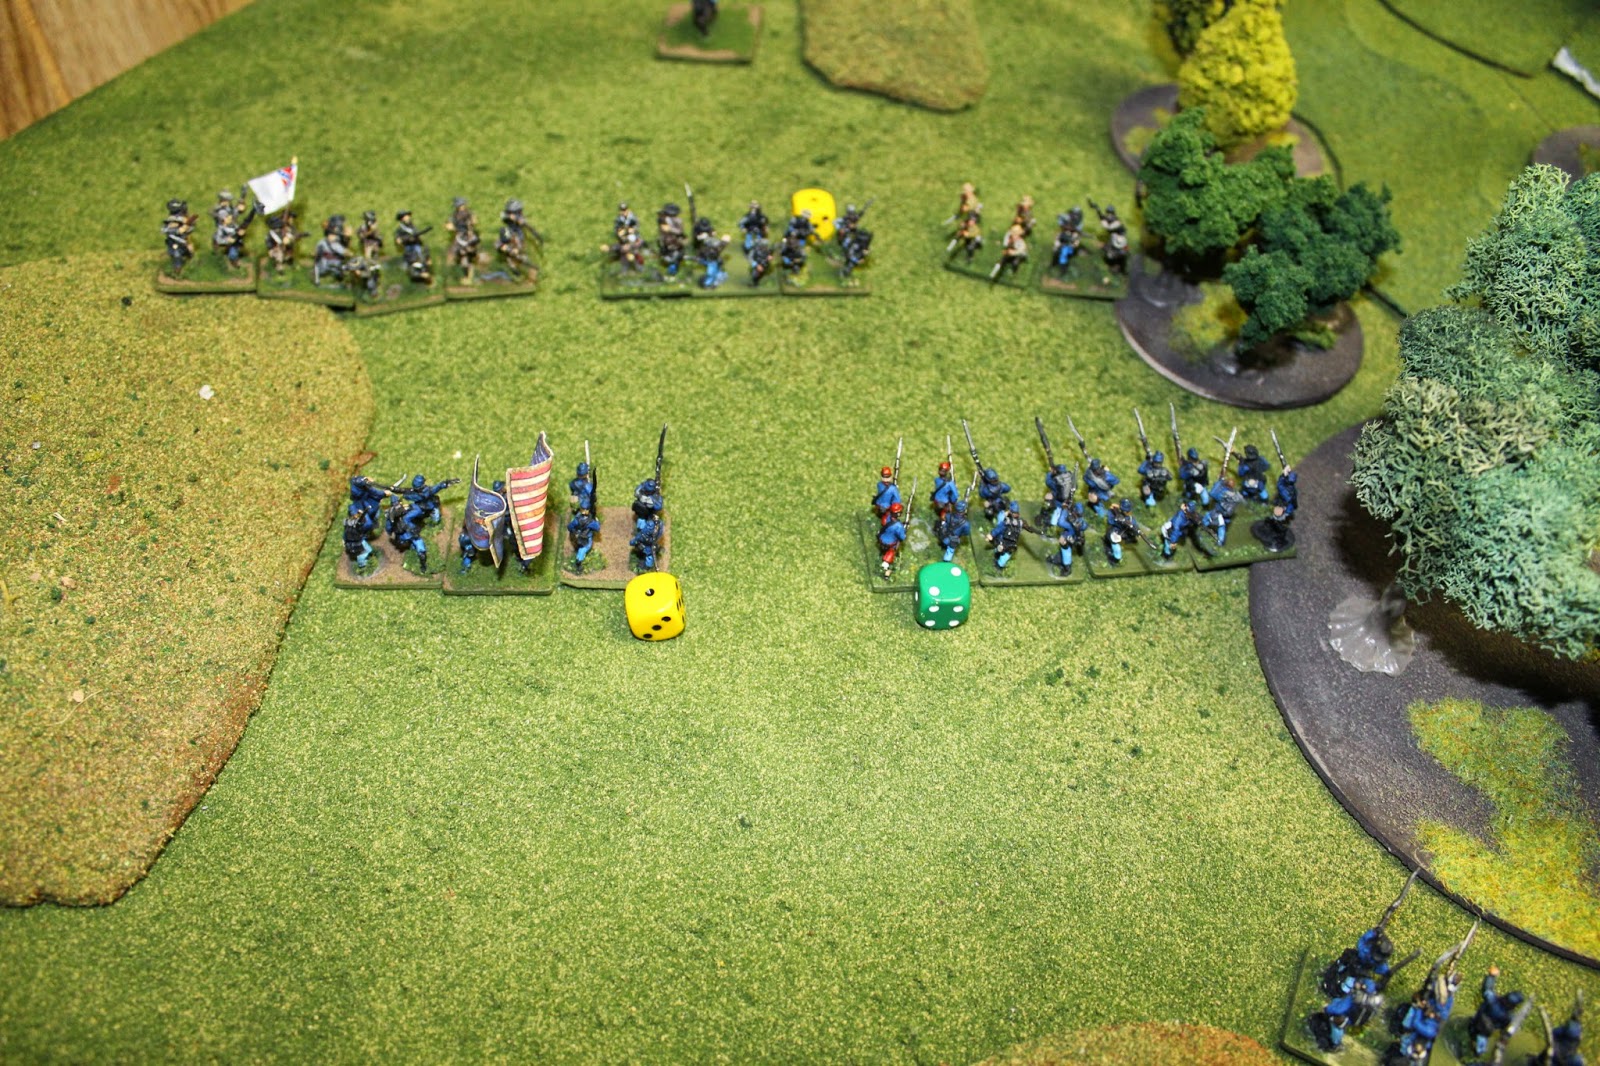
| The Confederate Attack! Large, "Regular" Brigade on the left, smaller 3 Regiment "Veteran" Brigade on the Right. Interestingly, the Yankee deployed was exactly opposite, with a small "elite" Brigade on the yankee left (in the picture) and a larger, Regular Brigade on the right (in the picture). |
 |
| Gadzooks! Why are we always in the center of the line??? |
I diced for all of the startup positions. The Rebels were the attacker, and were tasked with seizing "bald" hill on the Union side. The Union were tasked with stopping them.
 |
| Yankee "elite" Brigade. A Zuoave Regiment and some "Black Hats" of the famed Iron Brigade. |
 |
| Some "splendidly painted" Confederates advance! |
The Rebel plan was to take advantage of clear ground on the Union left flank and sweep around, massing against the bald hill. This would be with the famed Rebel "Light Brigade" of Veteran infantry. The larger, 4 Regiment Rebel Brigade would advance the center and attempt to bleed the Yankees there, while also pinning them in place. Seizing Bald Hill would make the whole of the Union position untenable and force a retreat!
 |
| Rebel "Light"Brigade advances against almost no opposition! But the Yanks have spotted this development and deploy accordingly to guard their flank. |
 |
| Rebels advance through Raccoon Gap! |
 |
| Meanwhile the solid Union troops re-deploy to hold the center. |
 |
| Can the Yanks redeploy in time to save Bald Hill?? (pictured with the lone regiment atop) |
 |
| Rebel Battle Lines advance! |
 |
| The lines draw ever closer but no one is yet in range! |
 |
| Meanwhile on the Union left, 2 Regiments are in place to contest Bald Hill. |
 |
| The Union Center, regulars take cover amidst some rough scrub while the Gray mob swarms toward them! |
The battle is joined by Union Artillery who were unlimbered a turn before their Rebel counterparts. 2 ones are scored! Hardly an auspicious beginning for the Yankee gunners!
 |
| The battery scores no hits! |
 |
| More fire opens up along the line as the Artillery starts to earn their pay |
 |
| This unfortunate Rebel battery in the background, surely brought along due to the importance of seizing Bald Hill, never got the opportunity to fire as ranks closed, so did their fire lane! |
 |
| The left flank of the Rebel advance held up by woods |
The Union Artillery scores some hits against the Rebel troops in the center but thanks to the Yankee cleverness in selecting defensive positions, the Reb artillery fails to score any hits this round.
Finally the troops advance into musket range....Stationary Firers Fire First!
 |
| A murderous volley! |
 |
| The moving Rebs catching hell |
 |
| One Rebel regiment loses a stand and fails his Morale Check - becoming disorganized! |
 |
| After the first turn of musketry. Dice are casualties. Yellow dice indicate "disorganized" units while green dice indicate "Normal" morale units. |
 |
| Meanwhile, the Rebel Light Brigade attempts to charge next turn! |
 |
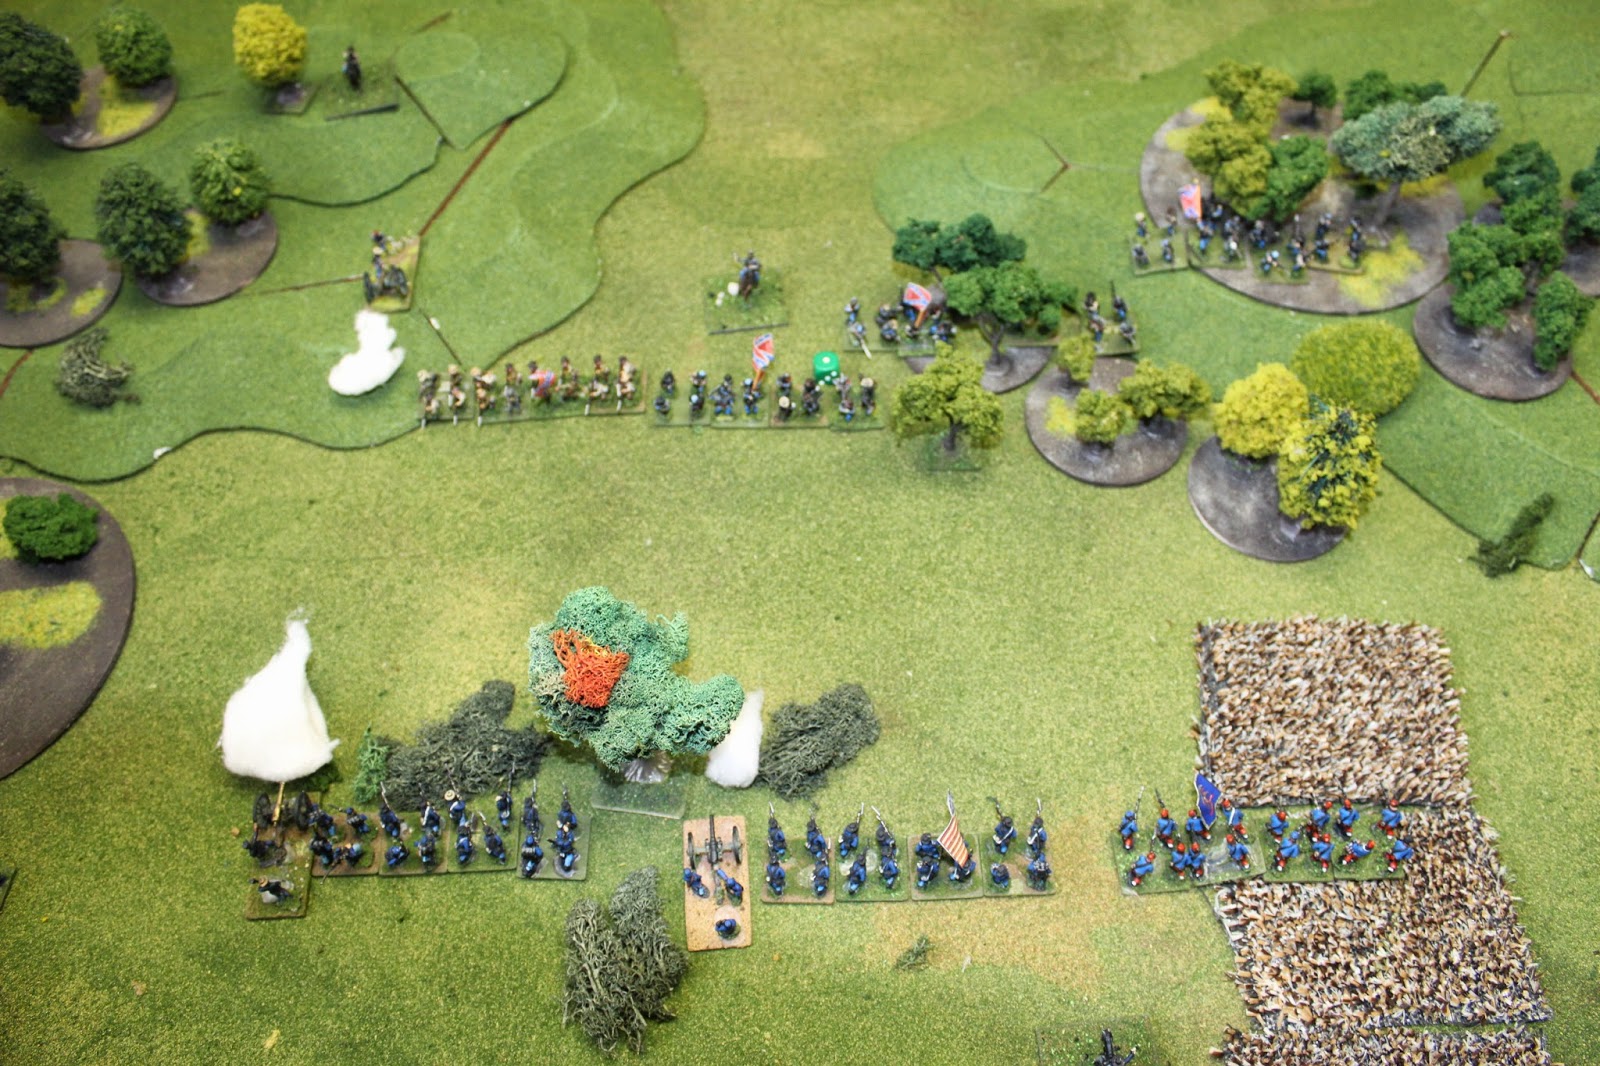
| Overall dispositions - Battle on the left is heating up as a crucial Yankee Regiment goes "disorganized" The meatgrinder battle evolving in the center is starting to take a toll on the advancing Rebels. |
The Rebel advance on their left finally shakes itself out of the woods and they have 2 fresh regiments to commit to the battle! They are, however, coming up against "Elite" Union troops!
 |
| Yankee Artillery forces a Rebel unit behind another into cover. |
 |
| A successful Rebel Quality Check allows them to charge into the disorganized Yankee unit. The Yanks fail their Quality Check and are forced back! That's them in the lower left hand corner. |
 |
| Veteran Rebs let loose a Rebel Yell and charge straight-away into a Yankee unit defending Bald Hill. It gets mauled and falls back with heavy casualties. The Rebs unbelievably pass all their Troop Quality saves and are yet unscathed! It looks as if Bald Hill is within their reach. |
Thoughts on the Rules So Far:
A hearty thanks to all for reading (especially if you've made it this far!). If you've read my previous posts regarding Muskets & Mayhem you know one of my favorite features of these rules are the Sequence of Play, with its phased casualties. Moving is necessary, but stationary firers are rewarded by firing first.
Differentiation between Troop Quality and Morale Levels:
I'm actually writing this more for me than you, the reader. So in M&M, you roll Troop Quality rolls when you take hits to see if your hits become casualties (your troop quality roll is your save). Once you've amassed 4 hits causing you lose a stand, you must successfully complete a morale check.
The morale check is based on your current Morale Level (Normal, Disorganized, Shaken). So you could technically be down to 1 stand and still have "Normal" morale, enabling you to shoot and hit on a 4+, if your rolling is good enough.
Your troop quality level enables you to withstand fire better by canceling out more hits, but that's all it does. (or at least this is how I played it - Darren - you've been most patient with my fog of war in this regard!)
Ties in Initiative Rolling:
Here's an interesting rule - I thought about giving ties to the unit who had more "veteran" or "elite" units within the force. Since these are supposed to be more "old school" in flavor, I just opted to roll again. Thoughts?
Movement through woods:
halved. Since I played in centimeters, this really slowed my foot troops down.
Command Radius:
units outside should experience some kind of negative effect. I had 1 Regiment on the Union side attempt to extend their line out and this brought them to well outside command radius and well outside any kind of cohesive distance from their sister Regiment. They should be penalized for this.
Advanced Small Arms & Artillery:
In this ACW game, I made the Musket Range 15cms and the Artillery 30cm. I should have used Darren's 12cm/24cm but forgot where I had it saved (it was in my email).
Artillery Morale:
I made all Artillery Unit Quality "Veteran" regardless of side. My union batteries were mixed with 2 stands and 3 stands of crew, while all my rebel batteries had 2 crew (crew = # of firing dice).


I love the battle report Steve - excellent. The terrain is superb - love those hills and objectives. The pics are superb.
ReplyDeleteI think you're spot on with rules amendments:
1. Troop quality is the key to this system I think - and indeed, all Horse & Musket warfare. Better units can 'potentially' sustain more punishment, yet there is a chance for them to vanish unexpectedly. Lesser units have the potential to hold on, but it's less likely. I think the troop quality rules make the AWI a real contender here too.(British regulars and American tenacity etc. Cowpens a particularly good example).
- Vet unit bias when there are ties in initiative rolling works for me. I really like this idea. For Napoleonics, it gives the French the edge. For AWI, the British in early battles etc.
Command radius is essential - I agree. It hasn't affected me so much in my playtests, though it has to be a focus for officers. The only caveat perhaps is if we allow them to attach to a unit and dismiss a casualty - which might have an effect on their command radius. Hence, it brings in more resource management issues. How about a reduction in Troop Quality when they are outside command radius?
These rules, despite our contention that they are 'pure' old school, are really resource intensive, and you find yourself having to manage the battlefield.
Although we don't have the modern trend of limited movement/firing across the battle, we DO have a real focus on how we manage and husband resources. This is fostered through::
1. Alternate movement in the game turn
2. The sequence of the game turn in terms of when units can act and when casualties and troop quality checks are made (genius!).
I think this can be summarised as : easy to play, difficult to master. The cornerstone of any good ruleset.
(We need to expand into corps/army level rules Steve. I want to do Borodino. ) )
Darren,
DeleteThanks for commenting! Yes this was a great game. It was nothing like Black Powder, which, I believe is over too quickly and leaves me feeling "hollow" inside...
This game really gives the "feel" of a battle. Playing in centimeters, there was ample time for maneuver and when the combat starts, it was by no means over in 2 turns. Unit strengths allow for "running battles" or even "firefights" where regiments can trade volleys before someone inevitably breaks from the fight or attempts to leave.
I like your rule about dismissing a hit if the officer is attached, assuming he survives a casualty check if attached.
I actually did just that - reduced the Union unit to Disorganized until they could return to Command Radius.
As far as expanding into higher command, I am completely for it and have started brainstorming on a higher-level rules where individual units or stands are Battalions or even Brigades, allowing the player to take the role of a Corps Commander or Army Commander. Some of the tenets I' thinking of are:
1. HQs have essential functions on play. That is, a HQs or Command stand is important to how you play, like a King is in chess. No combat power on its own, but the overall center of gravity for your force.
2. Same or extremely similar sequence of play to Muskets & Mayhem where stationary units enjoy advantages in firepower.
3. Troop Quality is of vital importance.
4. Command & Staff functions modeled in a simple and elegant way.
5. Large battles are able to be played in a reasonable amount of time.
6. The humble D6 is used.
7. Morale is crucial to continuing an attack
Yes - excellent points for corps level rules - perhaps we also need to look at an intuitive mechanism, that fits with rules as they are, but incorporating 'division exhaustion' style management - similar to V&B.
DeleteThere is another thing which came up in our playtest last week. The move-countermove during the turn means that a side in a defensive position may not want to move at some stage. Does that mean that it passes, then can move later if it chooses - or that a 'pass' actually means that it loses the opportunity to move a unit?
The issue might be that if we allows passes to move later - then it becomes a UGO IGO system entirely. Perhaps best if passes are ok...but when one side has moved its last unit, only one unit can be moved on the opposing side before round is finished, thus preventing wholesale 'waiting until I see all that you are moving' style play - I'm rambling on this one.
That's exactly what I was thinking in terms of Corps Level rules. I was thinking of"fatigue points" being accumulated and tracked at the HQs much like in V&B.
DeleteIt's interesting you talked about move passes and being on the defensive. In today's battle, it came down to the point where only 1 Regiment on the Union side would move, while the majority of the Rebel Regiments would move in the attack.
This same question came up - I played it a little more restrictively. That is, once any side "passed" movement - that is - he had no other units he wanted to move (but still had many that were eligible) his portion of the movement phase was over and the other side continued with all of his moves until they were complete.
So in my game today, when one side "passed" his forces were considered as having moved completely. I like your suggestion about allowing one side to move 1 unit once the other side has passed. (hell - Squad Leader even has an "advance phase" where units can move 1 hex regardless of circumstance).
Call it a "bonus" pass movement? Make it optional? Am I being too restrictive?
Perhaps we don;t actually need the restriction now I think about it - I think your method works more intuitively. As soon as one side passes, he effectively passes movement to the other - who is free to move remainder of units. There doesn't really need to be any other mechanism I guess, as the defender then has the massive advantage of non moving muskets firing first and devastating the enemy's line (potentially).
DeleteI'm probably overthinking it - perhaps leave as is.
I do like the idea though that the opposing side could move 1 unmoved regiment at the end of the turn (perhaps if they held the initiative?) Kind of like a bonus. Seemed like a good idea.
DeleteI'm not one for ACW gaming to be honest, but once again you've made a wonderful table with great scenery and models, coupled with an interesting and enjoyable write-up. Thanks!
ReplyDeleteThanks Paul! I'm still playtesting these rules and trying them out with all sorts of periods (SYW, AWI, ACW, etc).
DeleteWell my Battlegroup Blitzkrieg pre-order arrived this week and I'm still all keyed up to pay some BG Vietnam...
DeletePaul,
DeleteI've got my infantry units all painted up. I need to jump right in and play a BG Vietnam game. This week a friend is stopping by to play FUBAR: Middle East Modern or some Modern Disposable Heroes. After that, it frees me up to experiment with BG: Vietnam!
Well it might be possible to port some of the weapons systems directly. Much of the Main Force VC stuff was old Soviet or older stuff anyway, the M60 was an ungraded copy of the MG42 and the M14 was essentially an upgrade M1. So from those humble beginning I think we can cobble something together...
ReplyDeleteyes it will definitely be cobbled together. From now on, all of the WW2 US G.I.s that I paint will have OD solid pants and jackets so I can dual-use them in the Korean War, but wouldn't it be cool if they represented early 1960s ARVN troopers as well? M1 Carbines, M1 Garands, and .30 cals!!! All with US advisors in tiger stripe camo and M16s! Throw in some M113s and some M5 Halftracks and that's quite an "early war" force to battle the VC.
DeleteVery nice table! What scale are the miniatures?
ReplyDeleteThanks Beast! All are 15mm. Most of them are either Old Glory 15s, or Musket Miniatures although there are some "mystery" figures I purchased off ebay awhile ago. Don't know if they're Blue Moon, Essex or what...
Delete